Which devices/firmware are compatible?
Device
iPad
- iPad Pro (10.5-inch), iPad Pro (12.9-inch) (2nd generation)
- iPad (9.7-inch)
- iPad Mini 2
- iPad Mini 3
- iPad Mini 4
- iPad Pro 1st-Generation
- iPad Air 2nd-generation
- iPad 5th-generation
Important – Support for iPhone 5S, iPad Mini 2, iPad Mini 3, as well as the iPad Air is experimental as of version Beta 0.9. iPad Air 2, iPad 5th generation, and iPad Pro 1st generation are not supported as of yet (Update: These devices are now compatible).
iOS 13
- iOS 13.0
- iOS 13.1.1
- iOS 13.1.2
- iOS 13.1.3
- iOS 13.2
- iOS 13.2.1
- iOS 13.2.2
- iOS 13.2.3
- iOS 13.3
- iOS 13.3.1
- iOS 13.4
- iOS 13.4.1
- iOS 13.5
- iOS 13.5.1
- iOS 13.6
- iOS 13.6.1
- iOS 13.7
Method 2: Jailbreak iOS devices with a third-party tool
As you can see, it takes so much effort to jailbreak an iOS device all by yourself. And it’s quite complicated, especially for green hand to Linux OS.
This method is to use checkra1n on Windows PC with a checkra1n jailbreak USB drive created by Cocosenor iBypass Tuner. You just need to create a jailbreak USB drive with Cocosenor iBypass Tuner in a few clicks. Then make your computer boot from the USB drive and follow the instructions to jailbreak your iOS devices.
- Module:
- Tools needed list:
- Cososenor iBypass Tuner.
- A USB drive.
- Advantages of jailbreaking with the help of Cocosenor iBypass Tuner:
- 1. It could massively downgrade the difficulty of jailbreaking an iDevice on Windows.
- 2. It could help you jailbreak almost all iOS devices with just your Windows PC.
- 3. It can help you bypass iCloud activation lock and turn off FMI without password.
Therefore, I strongly recommend you this tool – Cocosenor iBypass Tuner. Now, let’s see how to take advantage of it to jailbreak an iOS device.
Part 1: Make a checkra1n jailbreak USB drive
Step 1: Download and launch Cocosenor iBypass Tuner.
Click here to directly download:
Step 2: Click Burn.

Step 3: Choose the USB drive and click Start.

Be aware of that the burning process will erase all data on the USB drive. If it’s not a problem for you, click Yes.

It’s going to take a while for this creation process. But waiting is worthy.

And after the burning process completes, click OK and go to the next part.
Part 2: Jailbreak an iPhone on Windows PC with a jailbreak USB drive
Step 1: Reboot the computer and enter BIOS settings.
Step 2: Open Boot Menu and choose to boot from the jailbreak USB drive just created.

Step 3: Connect your iOS device to the PC and click to set on jailbreaking.

As you can see, the software may alarm you that the iOS version of your device is not tested. If you are ready to jailbreak the iOS device at risk, follow the steps below to enable the Start key.
- Steps to enable key:
- 1. Click ;
- 2. Select Allow untested iOS/iPadOS/tvOS versions;
- 3. Click to get back to the homepage;
- 4. Click to set on jailbreaking process.
Step 4: Put the iOS device into DFU mode.
Then the program will show you how to put the device into DFU mode. Just strictly follow the instruction step by step.

Now the device is jailbroken successfully.

Note: Cocosenor iBypass Tuner now utilize checkra1n 0.12.2 to help jailbreak, which means it doesn’t support to jailbreak an iOS device with iOS 14.5.
- Fixed: iPhone Stuck on White Screen
- How to Access Apple ID if Forgot the Password
- How to Remove Lock Screen Password
- How to Use IPSW File to Restore iPhone on Windows 10/8/7
Checkra1n Jailbreak for Linux users
Checkra1n Jailbreak supported Linux for iOS 14.8 — iOS 12.3. You can download Checkra1n for Linux using Checkra1n Downloader.
Step by Step Guide of Checkra1n Jailbreak
Note: Download Checkra1n for Linux using Checkra1n Downloader according to your computer OS. There are CLI versions for x86_64, arm, arm64, and i486 architectures.
Please check your system architecture and download the correct file.
Step 1: Open downloaded Checkra1n file and open terminal. Then type the following commands on the terminal.
- chmod +x (drag and drop the checkra1n folder).
- Sudo (drag and drop the checkra1n folder).
Step 2: if you have already set up a device password, it will ask the password. If not checkra1n Linux jailbreak will open your computer screen. Now you can click the start button and proceed to the jailbreak. (Same as).
Запуск и установка джейлбрейка Checkra1n
Основная установка завершена, но что бы установить Checkra1n нужно пару манипуляций. Давайте же разберем их.
1. Жмем на открывшемся окне кнопку “Options” и ставим галку на “Allow untested iOS/iPadOS/tvOS versions”

2. Подключаем устройство и жмем далее.
3. Сама программа уведомит нас что перезагрузит устройство и введет его в режим восстановления.

4. Когда Checkra1n переведет ваш девайс в DFU, он сам же предложит установить джейбрейк, нужно нажать на кнопку “Start” и внимательно смотреть на экран, и зажимать кнопки которые просит программа (в моей версии iPhone X).

Как будет завершена установка, значит это всё. Можно перезагружать компьютер и открывать свой джейлбрейк Checkra1n на устройстве который мы загрузили благодаря Windows системе, хоть и через танцы с бубном.


![Checkra1n jailbreak [supports ios 14.8 - ios 12.3]](https://reaktiv-rf.ru/wp-content/uploads/6/8/b/68b66f74067386708ee66746f93ca56d.jpeg)

![How to jailbreak ios 16/15 using checkra1n or unc0ver? [really working]](https://reaktiv-rf.ru/wp-content/uploads/c/8/8/c884a7db8ae50e98a7d4bafc5e28f8ce.jpeg)
![[2023] how to jailbreak ios devices on windows computer easily](https://reaktiv-rf.ru/wp-content/uploads/1/e/a/1eab804c1b3b5fe7f682da8690c97297.jpeg)
![Checkra1n jailbreak [supports ios 12.3 - ios 14.8]](https://reaktiv-rf.ru/wp-content/uploads/7/2/4/7244c9403b839df67fb712b9df36dd54.png)
Находим ярлык Checkra1n и жмем Install Cydia.
Не забывайте, после каждой перезагрузки джелбрейк слетает, так что советую вас сохранить флешку!
Checkra1n Supported iOS Versions
iOS 14.7.1, iOS 14.7, iOS 14.6, iOS 14.5.1, iOS 14.5, iOS 14.4.2, iOS 14.4.1, iOS 14.4, iOS 14.3, iOS 14.2.1, iOS 14.2, iOS 14.1, iOS 14.0.1, iOS 14, iOS 13.7, iOS 13.6.1, iOS 13.6, iOS 13.5.1, iOS 13.5, iOS 13.4.1, iOS 13.4, iOS 13.3.1, iOS 13.3, iOS 13.2.3, iOS 13.2.2, iOS 13.2, iOS 13.1.3, iOS 13.1.2, iOS 13.1.1, iOS 13.1, iOS 13, iOS 12.5.4, iOS 12.5.3, iOS 12.5.2, iOS 12.5.1, iOS 12.5, iOS 12.4.9, iOS 12.4.8, iOS 12.4.7, iOS 12.4.6, iOS 12.4.5, iOS 12.4.4, iOS 12.4.3, iOS 12.4.2, iOS 12.4.1, iOS 12.4, iOS 12.3.2, iOS 12.3.1, iOS 12.3, iOS 12.2, iOS 12.1.4, iOS 12.1.3, iOS 12.1.2, iOS 12.1.1, iOS 12.1, iOS 12.0.1, iOS 12
How to jailbreak iOS 14
checkra1n is a semi-tethered jailbreak tool that requires a computer to start the jailbreak. If you own a supported iDevice and can connect it to a PC or Mac you are closer to jailbreaking the system.
1. Download checkra1n.
2. Open the dmg package.
3. Move the app to the Application folder.
4. Open the checkra1n app.
5. Connect your iPhone to PC or Mac using USB cable.
6. Click start to jailbreak your device.
7. checkra1n will activate Recovery Mode.
8. Enter DFU mode (screen must stay black) on your iDevice.
Enter DFU Mode before jailbreak:
- Keep iDevice in Normal Mode or Recovery Mode, plug USB cable (please don’t use USB extension cable)
- Hold HOME button (iPhone7/7p hold Volume Down button instead), then hold POWER button until the screen is blank
- Release the POWER button after about 10 seconds, but keep holding the HOME button (iPhone7/7p hold Volume Down button instead) for about 5 seconds
iPhone8, iPhone8 Plus Steps to enter DFU Mode:
- Plug an original USB cable, quick-press Volume «+» button, then Volume «-» button and hold the Power button.
- When the iDevice turns off, hold the Volume «-» button, then release the Power button after 5 seconds, until it prompts «succeded».
9. Wait till the device will boot into jailbreak mode.
10. Lunch checkra1n loader from home screen.
11. Install Cydia to access tweaks.

Set nonce with checkm8-nonce-setter
checkm8-nonce-setter is a nonce setter for devices compatible with checkm8 exploit used by checkra1n. iOS version doesn’t matter. If your device is compatible with checkm8 + Linus Henze’s Signature Check Remover then you can set your nonce and downgrade. This script is macOS only.

To start the script open the Terminal app and proceeded with instructions. After setting nonce you can futurerestore with the SHSH you used during the script and downgrade iOS 13 to unsigned version.
Nonce is a signing method that randomizes Apple’s cryptographic signature hash blobs (SHSH blobs) and is used with the baseband signing ticket, the APTicket, and SEP (Secure Enclave). Every time if you restore the device, a random string of letters and numbers is generated.
The nonce (e.g. 0x532fd02xd15k30) is sent to apples serves to request a blob (or APTicket) for the firmware you want to restore. If the nonce of the device and the APTicket match, you can restore even no longer signed IPSW system file. There are few nonce generators available to set a nonce on iOS.
Alternatively, you can also use CheckNonceGUI, which is a graphic interface for Checkm8 Nonce Setter. The app supports devices like iPhone 5s, iPhone 7/7 Plus, iPhone X, iPad Mini 2, iPad Mini 3, iPad Air, iPad 6th Gen, iPad 7th Gen, and iPod Touch 7th Gen.

How to use checkra1n from terminal (CLI)
checkra1n was written in nano by Kim Jong Cracks and you can also run the tool from the console using the command line. There are four command parameters available -h (for Help), -d (Demote), -V (Verbose Boot), -s (Enter Safe-Mode), — (run as daemon).
1. Open Terminal app on Mac OS.
2. Enter /Applications/checkra1n.app/Contents/MacOS/checkra1n —
3. The app will now run as daemon and wait for DFU device.

The main advantage of using checkra1n CLI (the command-line interface) is the ability to jailbreak the newest releases of iOS system. When the GUI (graphic interface) informs you that this version is not supported, proceed with CLI to jailbreak anyway. The latest version of iOS 14 is supported.
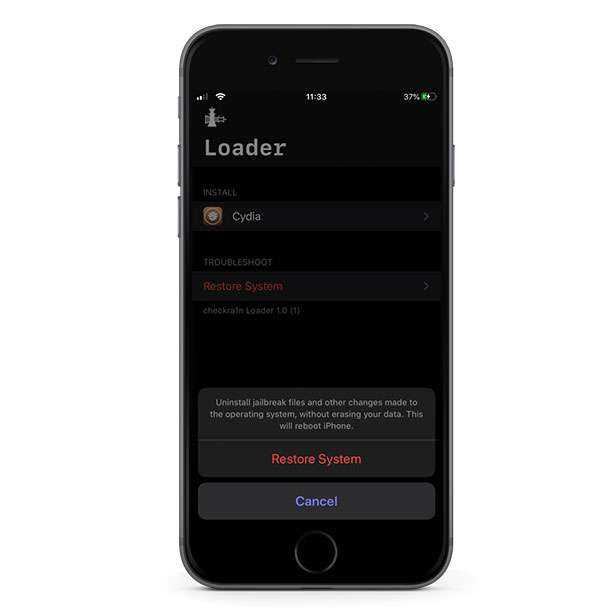
How to remove checkra1n
The latest version of checkra1n app allows you to easily remove the jailbreak from your device. checkra1n loaders installed on your iOS device allows you to install Cydia. Besides that, there is also an option to Restore system. When you click on this option you will uninstall jailbreak files and other changes made to the operating system, without erasing data. This will reboot iPhone.
Upgrade jailbreak to latest iOS
The safest way to update iOS on jailbroken device is to restore the system to the state before you have jailbroken your device in the first place. This option is available via Loader app (the same you used to install Cydia) available from home screen. It is also important to save all tweaks and settings on checkra1n jailbreak to restore them after re-jailbreaking the upgraded iOS version.
1. Install Batchomatic tweak to save all tweaks, apps, and settings.
2. Generate a .deb file with iOS jailbreak configurations.
3. Save the .deb file on any Cloud service.
4. Open the Loader app and tap Restore System.
5. Navigate to System → General → Software Update.


![Tutorial for jailbreaking ios devices on a windows computer [2 methods]](https://reaktiv-rf.ru/wp-content/uploads/0/8/2/082b787a9fe675f4045343a2460cf7bd.jpeg)


6. Update iOS to the newest version.
7. Jailbreak your device using checkra1n.
Step 8. Move the .deb file on your device and install it using Filza.
You Might Also Like
- How to Turn Off iPhone Camera Sound (Japanese/Korean/Unrestricted)
- Can You Really Get a Free iMyFone iBypasser Registration Code?
- How to Bypass Activation Lock on iPhone?
- A Complete Guide to Unlock Rogers iPhone
- How to Network Unlock iPhone Free?
- “Locked SIM iPhone PUK Code” – Resolve this Issue Swiftly
- How to Unlock Simple Mobile iPhone
- How To Unlock Verizon iPhone By Using SIM Carrier
- What Does an iPhone Activation Lock Mean? — Everything You Need to know About it
- An Ultimate Guide on How to Unlock Xfinity iPhone Easily
- Full Guide to Unlock Vodafone Phone
- How to Unlock iPhone with or without Siri
Можно ли поставить iOs на обычный компьютер, ноутбук?
- Как известно, операционная система iOS является мобильным программным обеспечением и предназначена для эксплуатации на таких устройствах от фирмы Apple, как iPhone и iPad. Многие пользователи данной ОС не понимают, почему ее нельзя установить на обычный стационарный компьютер или ноутбук по примеру операционных систем Windows и MacOS, даже если эти ПК имеют сенсорный экран.
- Некоторые из них полагают, что причина заключается в несовместимости мобильной ОС с некоторыми компьютерными комплектующими. В каком-то смысле это правда. Большинство производителей видеокарт и другого компьютерного «железа» не разрабатывают драйвера под данную ОС. Следовательно, если бы даже удалось ее запустить на компьютере, вряд ли бы она работала корректно. Однако основная причина кроется совсем в другом.
- Любая из существующих операционных систем имеет строгие требования к архитектуре центрального процессора. Как известно, стационарные компьютеры и ноутбуки оснащаются процессорами от производителей Intel и AMD с архитектурой x86 или x64. Данные ЦП попросту не в состоянии будут распознать код, используемый в операционной системе iOS. Для данного типа программного обеспечения требуются чипсеты с архитектурой ARM, которые отличаются меньшими размерами и минимальным энергопотреблением. Да и в целом работают они совершенно по другому принципу.
- Следуя из всего выше сказанного можно сделать вывод, что установка мобильной операционной системы iOS на стационарный компьютер или ноутбук невозможна. Однако существуют специальные программы-эмуляторы, с помощью которых Вы без проблем сможете запускать приложения и игры, разработанные под мобильную «операционку» от Apple.
Install Unc0ver with a computer.
Now you can install Uncover by using a MAC/Linux/Windows computer.you can get Unc0ver in different methods. They are the Cydia impactor method, Alt Store method, 3U tool method, certificates method.
Install Uncover Method – 2 Cydia impactor
Cydia Impactor – With Computer/PC
How to Install unc0ver Jailbreak for iOS 11 – iOS 13.5 with Cydia Impactor
Download uncover jailbreak IPA file through using below button
Step 1:
Download the unc0ver Jailbreak for iOS 11 – iOS 12.4 IPA file onto your computer.
Step 2:
Download Cydia Impactor from here.
Step 3:
Connect your device to your computer using a USB cable.
Step 4:
Open Cydia Impactor.
Step 5:
Drag and drop the IPA file downloaded in Step 1 onto Cydia Impactor
Step 6:
Cydia Impactor will ask for your Apple ID and password, which is verified with Apple only and is used to sign the IPA file. If you are not comfortable providing it, then create an alternative Apple ID and use that instead.
If you do not have an Apple ID you can use this link to create an Apple ID
Step 7:
After the app is installed, go to Settings -> General -> Profiles (or “Device Management” / “Profiles & Device Management”).
Find the profile with your Apple ID and open it.
Step 8:
Tap on the Trust button.
Step 9:
Now open the app and enjoy it.
Install Uncover Method – 3
Jailbreak iOS Device on Windows with iRa1n
iRa1n is short of iRemovalRa1n. It is compatible with iOS 12.0 to iOS 14.8.1. Basically, it is the Windows version of checkra1n released inside the iRemoval PRO 5 app.
A Step-by-Step Guide to Jailbreak your iOS Device on Windows with iRa1n
Step 1. Click Downlod to download iRa1n on iSalvor.

Step 2. Launch iRa1n.exe after extracting iRa1n jailbreaking tool.

1. You need to extract all the ZIP files before you launch the file. Make sure you don’t run them directly from the ZIP files.
2. Users of Windows10 are advised to run the program as Administrator.


![Ios 15 jailbreak with cydia cloud [ free online jailbreak ]](https://reaktiv-rf.ru/wp-content/uploads/2/4/c/24c885cc3225be9dc1c8bc5c7ad2f06e.jpeg)


Step 3. Connect your device to your computer. Click «Trust» on your phone to allow the computer to recognize it. Installing the driver will be prompted the first time you launch the jailbreak tool. To confirm installation, click Yes and run the jailbreak tool again.

1. For Apple 6s-7P and iPad series (iOS14.4 and above): You should select «Options» and choose «Allow untested iOS/iPadOS/tvOS versions», then return to jailbreak.
2. For Apple 8-X (iOS14.4 and above): you should choose «Options» and check «Allow untested iOS/iPadOS/tvOS versions» and «Skip A11 BPR check».
3. For jailbreak Apple 8-X (iOS 14.0~14.3+): you should click «Options» and choose «Skip A11 BPR check», then go back to jailbreak.
4. On iOS 14.3 and earlier, you can jailbreak your device directly.
Step 4. Next, click Start to jailbreak your device. Put your device into DFU mode by following the instructions onscreen.

Step 5. iRa1n will start jailbreaking automatically. The process will take some time to complete.

Step 6. Now that your device has been jailbroken, you can use it as you wish. If you are still unable to jailbreak, please try the following steps again.

Appdb pro application (+) (iOS 15.0.2 beta 8- checked)
Appdb is a unique app, boasting more than 100,000 iOS applications in its database. To install it on your device via internet connection, you need the Appdb pro app (+). Now it works with iOS 15.0.2 as well as all previous beta versions of iOS 14; plus you can easily install this tool online for any iOS and iPad OS 14.2 model – even iPhone 12!
Importance of Appdb pro (+)
- Online jailbreak solution
- Compatible with every iOS version and model.
- More than 10000 iOS applications, including all jailbreak tools.
- You can download both the latest and old versions from any app.
- Incorporate all the hacked apps.
Zeeb is a website-based third-party application store for iOS 15.0.2. It allows you to install well-known iOS themes, apps Grammarly premium Cydia or Selio packages managers, as well as utilities, settings wallpapers, and more.
История с географией
О checkm8 известно уже давненько. Первые упоминания об уязвимости в BootROM яблочных мобильных устройств появились в Сети 27 сентября 2019 года, когда axi0mX публично сообщил в твиттере о своей находке. Горячую новость тут же подхватили многочисленные сайты и даже авторитетные СМИ, громко заявившие о появлении универсального джейлбрейка для целого зоопарка смартфонов от Apple. На самом деле полноценного джейла на тот момент еще не существовало: экспериментируя с DFU, axi0mX обнаружил аппаратную уязвимость, которую потенциально можно использовать для взлома файловой системы iOS.
Сперва с помощью checkm8 нельзя было сделать практически ничего, кроме замены стандартной загрузочной картинки iPhone в виде надкусанного яблока на что-то более оригинальное. Полноценный джейлбрейк с возможностью установки Cydia был представлен только 8 ноября на конференции POC2019 в Сеуле, да и тот пока еще находится в состоянии бета-тестирования.
В разработке джейла на основе checkm8 принимала участие целая команда исследователей, объединенная под общим названием checkra1n. В нее, помимо самого axi0mX и известного iOS-исследователя и талантливого хакера Луки Тодеско (qwertyoruiop), входит еще как минимум десяток человек, о чем красноречиво свидетельствует раздел Credits на сайте этой банды.
 Вот эти крутые ребята сделали джейлбрейк на основе checkm8
На сегодняшний день бета-версия разработанного командой checkra1n джейлбрейка позволяет взломать устройства с установленной iOS 13, начиная с iPhone 6S и заканчивая Х — на более ранних девайсах утилита не тестировалась. Как происходит этот взлом и на каких принципах он основан? Давай разбираться.