Есть ли проблема при установке ОС Android для настольных ПК?
Да, установка ОС Android на ваш компьютер — не простой процесс. И вы должны принять к сведению, прежде чем продолжить.
И вот почему:
По сравнению с полноценные настольные ОС, Android как ОС для настольных ПК не обладает большой функциональностью. Например, вы не можете управлять принтерами, и он также не поддерживает ориентированные на клавиатуру интерфейсы, как это делают другие настольные ОС. Более того, он не поддерживает довольно много передовых технологий, ориентированных на настольные компьютеры, учитывая, что у вас может быть оборудование высокого класса.
Короче говоря, настольная ОС Android не даст вам полноценного опыта работы с рабочим столом. Итак, вам следует подумать о запуске ОС Android через некоторые эмуляторы или как виртуальные машины, используя VMware.
Как стать адвокато…
Please enable JavaScript
Steps to Install Bliss OS on PC
- Download the latest version of Bliss OS.
- Attach a USB to computer.
- Download Rufus.
- Boot the system via flash memory.
- Run the Bliss OS Live and test its various features.
- If you wish, start installing this operating system and enjoy the experience on your PC.
Actually there are several methods where you can install the Bliss OS on your Computer. Android Operating systems, especially linux distros they do not require so much hardware acceleration parts. The point is, buy or relaucnh your older PC and follow the process to install Bliss in 2 minutes.
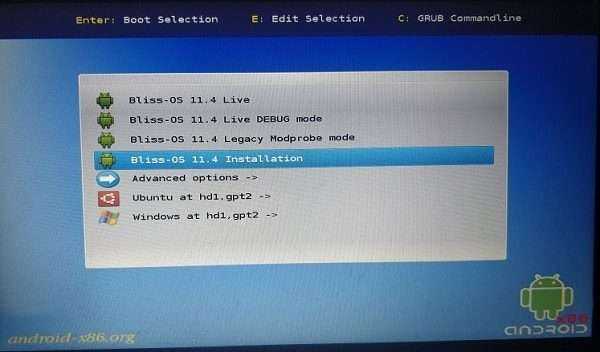
Attach the bootable Bliss OS to computer and hit the key of your computer. Choose the USB Flash and you will be installation window, use the arrow keys and choose Advanced options.
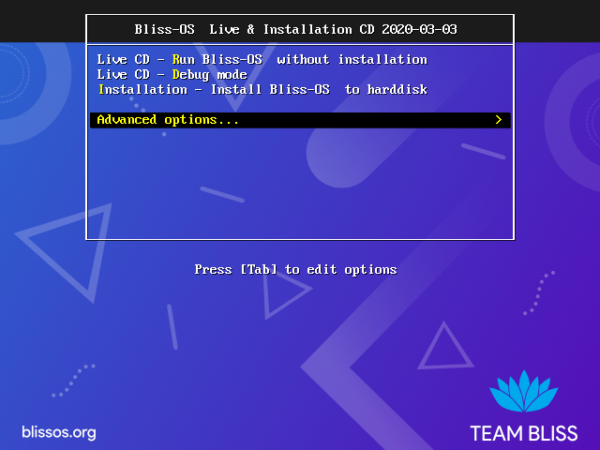 Advance Installation of Bliss OS
Use the arrow keys and choose Auto Install to Specified Hard Disk.
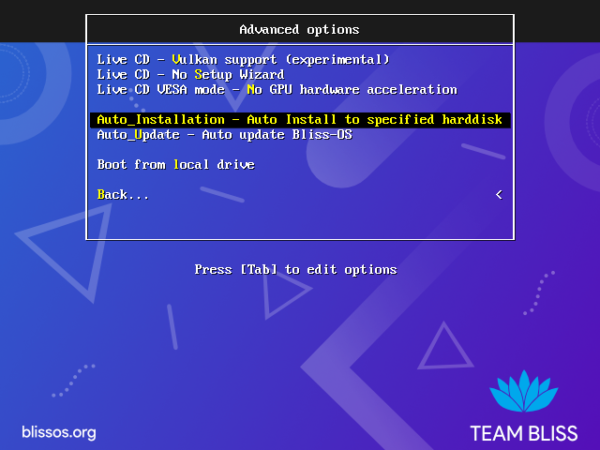 Auto Install to Specified Hard Disk
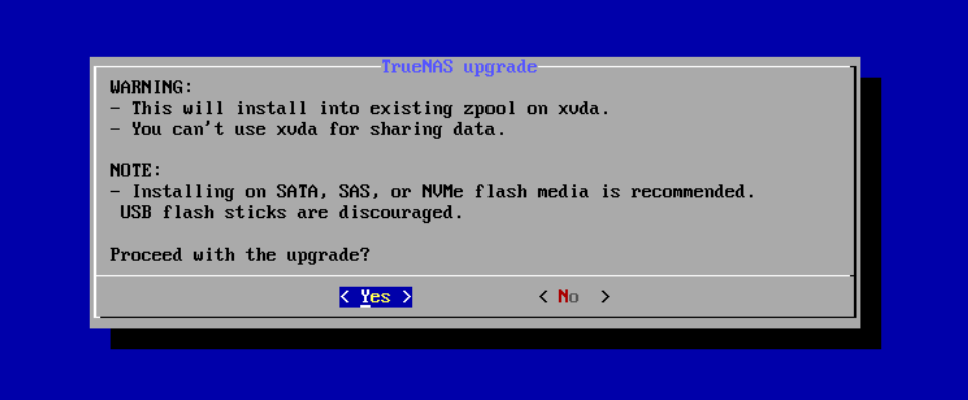
This is where the Bliss OS is asking again to confirm the auto installation, choose Yes and move to the next step.
 Confirm the Auto Installation
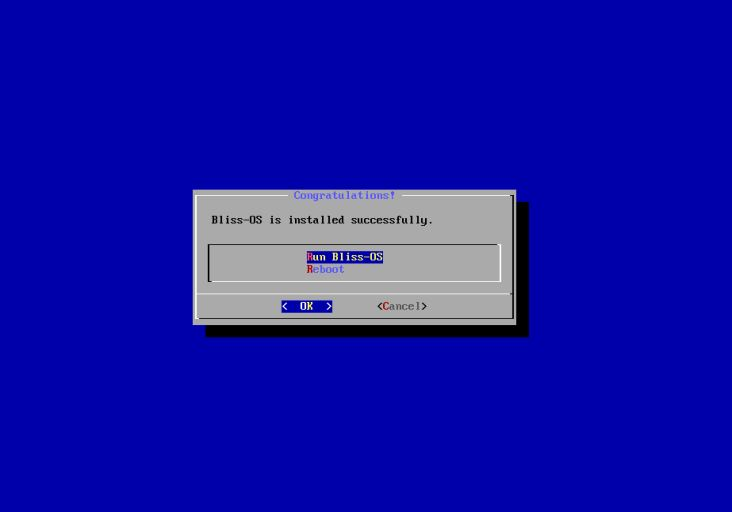
Wait until the hard disk partitioned, once its done it will ask you to reboot or exit the installer. Choose Reboot and remove the USB Flash Drive.
 Bliss OS Installed Successfully
After the installation you will be on the GRUB Bootloader Window, don’t do anything just wait.
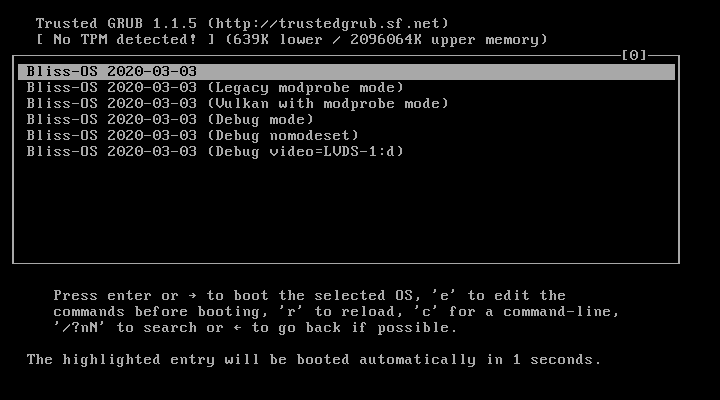 Bliss OS GRUB Bootloader
This is How you can install with a full Hard Disk wipeout, but what about a dual boot.
- How To Test Android Q (Android 10) On Windows PC- Hackintosh?
- How To Enable WhatsApp Dark Mode Android?
Android-x86
Some years back, not many saw the appeal of using Android on a PC. That was because of Android-x86 – one of the few options back then. It used to be the vanilla build, bare-bones, no-frills choice. The newer Android-x86, however, is based on Lineage OS, with no attempt to hide it, with giant Lineage logos appearing throughout its setup. Its cool splash screen does add a little panache.

Android-x86 used to be difficult to navigate without a touch-screen, but now it comes with Taskbar as standard, a desktop menu popularized by Bliss OS. Users can still choose a touch-style interface if desired (Trebuchet), which breaks down your apps into a nice alphabetical system and adds a close button to apps when multitasking.
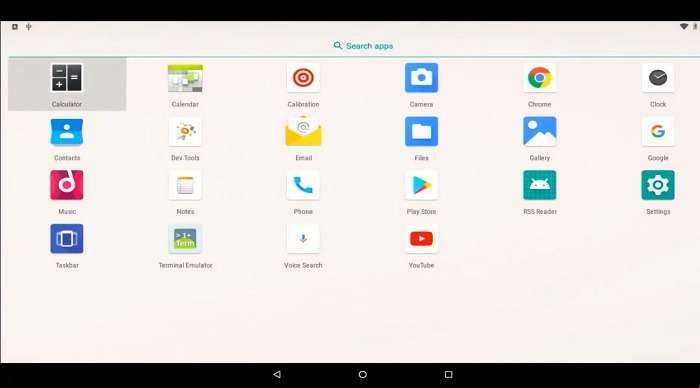
App-wise, you get AudioFX, a browser, YouTube and a few other apps, but this is still a pretty barebones system. You won’t get very far without logging into Google Play and grabbing what you need from there.
One thing we’re unsure of is its “Sleep” function. There’s no obvious “Sleep” button anywhere, and although it at least disabled the screens of our test laptops when we closed the lids, their fans were still running. Other reports suggest it suspends fine, though, so we’ll give them the benefit of the doubt.
In the last few years, Android-x86 has gone from being just a smartphone x86 port to becoming a viable desktop solution. It is still pretty minimalist, but it works. There are no nasty surprises waiting for you, no junkware, and it should work on any virtual machine without too many problems.
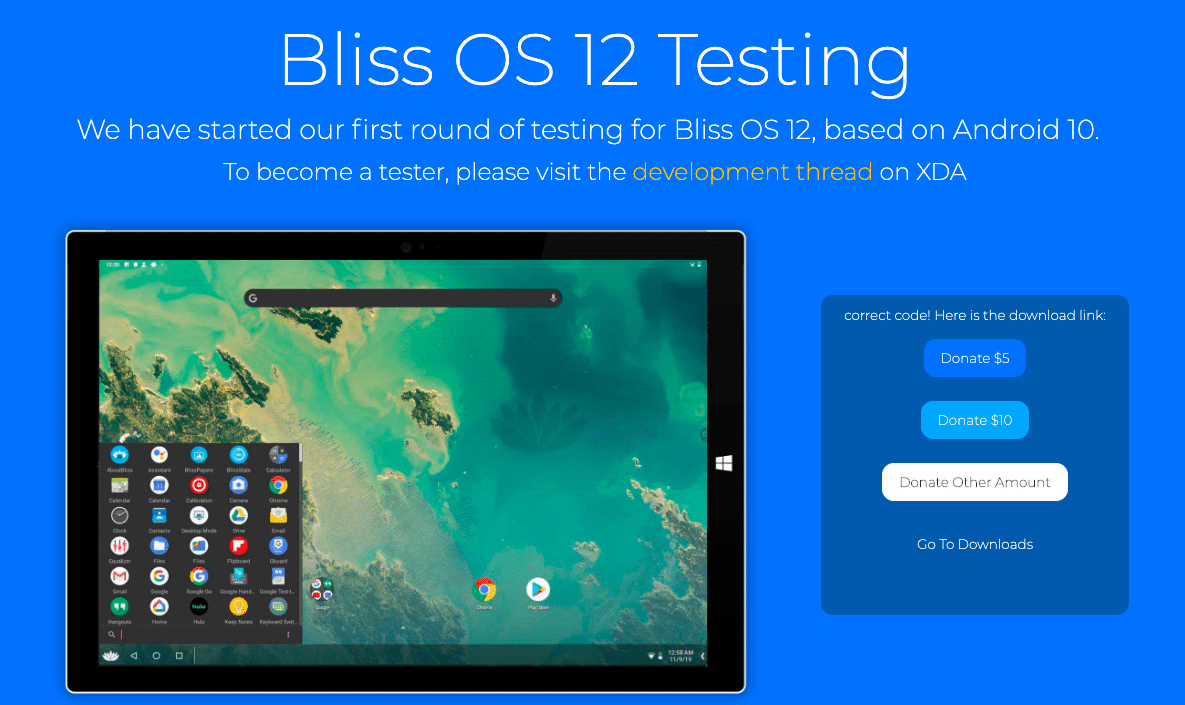
Почему именно Bliss OS?
Лучшее в использовании ОС Bliss на вашем ПК заключается в том, что если вы еще не получили обновления Android 10 на свой телефон, вы можете установить его на свой компьютер и сделать ставку на Android 10 на своем ПК бесплатно, звучит интересно? Несмотря на то, что смартфон по-прежнему работает под управлением Android 10, каждый хочет ощутить то же самое на большом экране с мощным оборудованием, которое только возможно на компьютере.
Особенности Bliss OS
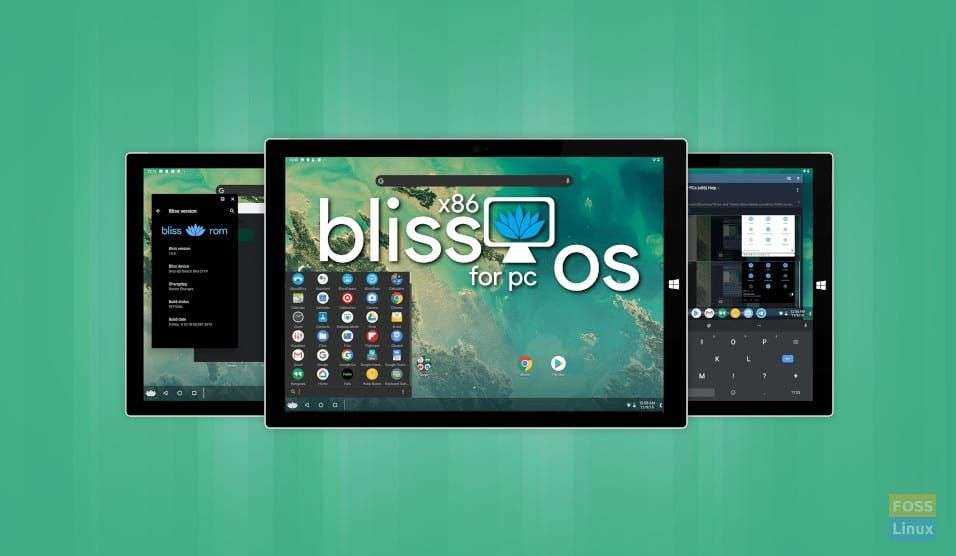
Визуально ОС Bliss имеет тот же стиль запуска в стиле рабочего стола, что и другая ОС Windows. Несколько лет назад компания Jide анонсировала аналогичную ОС Android, работающую на ПК, под названием Remix OS. Но позже разработчики прекратили его выпуск, но все же они запустили эмулятор Remix OS, который позволяет запускать приложения и игры Android на вашем ПК.
Вот некоторые функции, которые есть в Bliss OS.
- Он поставляется с параметрами настройки и тематики.
- Bliss OS может адаптироваться к любому размеру экрана, поэтому вам не придется идти на компромисс с идеальным качеством изображения.
- Bliss OS создана с упором на скорость и стабильность с настройками для работы с самыми требовательными приложениями.
- Удобство работы от аккумулятора: предусмотрены дополнительные параметры, которые помогут настроить потребление заряда аккумулятора до оптимального уровня.
- Он часто предоставляет обновления безопасности AOSP, поэтому используйте его без проблем.
Phoenix OS
Phoenix OS is a difficult one to rate. The OS is now full of adware (it wasn’t previously), with the intention that you subscribe to its service to remove ads. It doesn’t appear to be open source. It’s also full of Chinese software that could possibly be used in data collection, and occasional parts of the OS haven’t been translated into English.
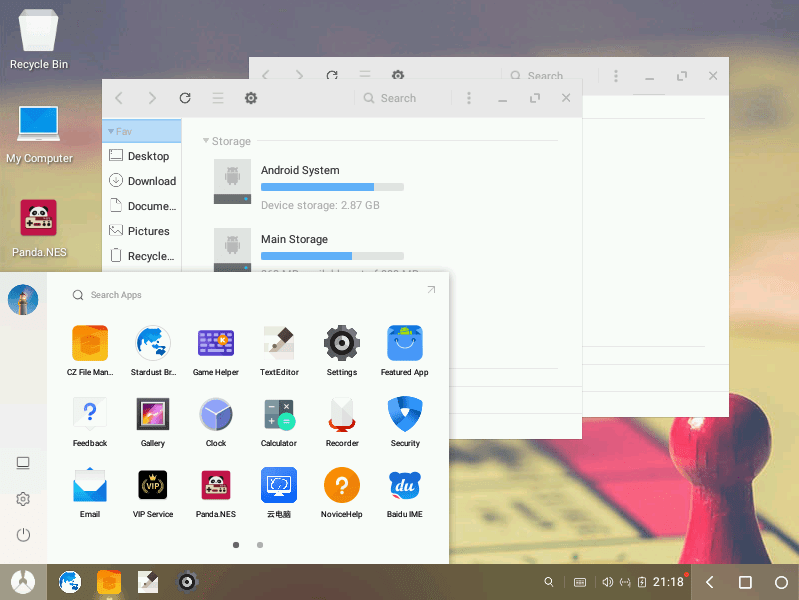
But underneath all of this is the most solid Android desktop, with a familiar window manager somewhat like Windows 7 and a good set of desktop tools and keyboard shortcuts to keep Windows users happy. It also has a working “Sleep” function and seems to have a decent hit ratio for working apps. There are also ways to remove ads besides subscribing, at which point Phoenix becomes very enticing.
Were it not for Chinese data concerns, it could probably be deployed on a large scale. It’s definitely worth considering, but that junkware makes us nervous.
Bliss OS Android 10 For Windows (PC) 64-Bit Download Free
Contents
Here we have shared the latest setup of Bliss os for pc. The emulator comes with Android 10. It also can support upcoming updates. You can install it on all over OS including Windows XP, Vista, 7, 8 & Windows 10.
How to Install Bliss OS For Windows PC
Install Bliss OS For Windows PC on your PC. To install Bliss OS, boot from the USB drive. In the startup menu, click on “Boot Device Options.” On the next window, select “Bliss OS” and then press the arrow key to choose it. Next, select the file system and partition from the list of options. After that, select “Install”.
How bliss OS Works
Bliss OS Android Emulator is one of the leading free Android emulators for Windows PC. It lets you download and install Android apps and games on your desktop. It supports various advanced features, including OpenGL and GPU hardware acceleration.
Furthermore, it is highly compatible with a large variety of apps. To install this emulator, you will need at least 2GB of free disk space. It will then prompt you to follow some installation instructions.
BlissOS is an Android x86-based operating system that allows you to experience a desktop on your PC. It is compatible with a wide range of x86-based devices.
Features
It features a multi-window interface, taskbar, and deca-pro key mapper for gamers. Bliss OS is free to download and use, and is a constantly evolving project.
Task Viewer
While Bliss OS is a great choice for people looking for a Linux-based operating system, it has one major drawback. It crashes constantly. Despite its name, Bliss OS is not designed to run on older computers.
In fact, Bliss OS is so demanding on the hardware that it is not recommended for users with very old computers. If you do have an older computer, you might want to consider switching to a Mac or Linux operating system instead.
First, you must download the ISO build of Bliss OS. Then, you can boot from it using a USB drive. To install it, you must burn the ISO image to a pen drive and then follow the steps to boot from the USB drive.
When booting from the USB drive, you must press a key repeatedly until the BIOS starts. Depending on the manufacturer of your computer, you may have to press the “Enter” key a few times before it boots up.
Requirements
Before installing the Pixel launcher for Bliss OS for Windows PC, you should first know that this is not the official version provided by Google.
To be able to install the Pixel launcher for Bliss OS for Windows PC, you need to first download the ISO file from the developer’s website. This ISO file has to pass a test, so you should read the instructions carefully.
To install Bliss OS on your PC, you need to download its iso file and burn it to a blank disc or portable USB drive. After that, the installation process is quite simple.
Then, you need to create a partition on your hard drive and boot the OS. You will then need to reboot the computer to install the pixel launcher. Once you’ve installed the OS, you can install other applications.
Stable ROM
To download the Stable ROM for Bliss-OS for Windows PC, follow the instructions below. The first step is to uninstall Secure Boot. Then, open the Boot Device Menu by pressing F9, F10, or F12.
From the Boot Device Menu, select Advanced options. In the Advanced options, you can choose to remove all data from the hard disk. Finally, choose Reboot to restart the computer. The Bliss logo should appear on the screen soon after the reboot.
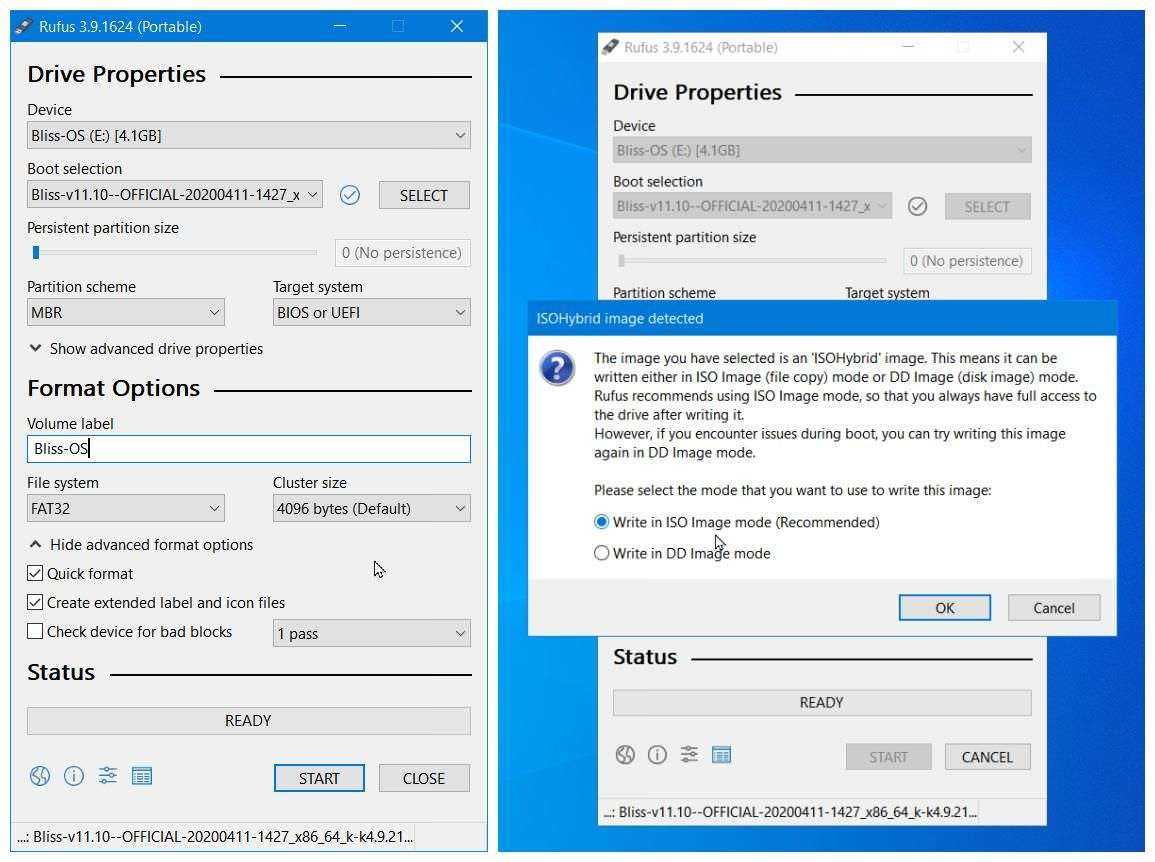
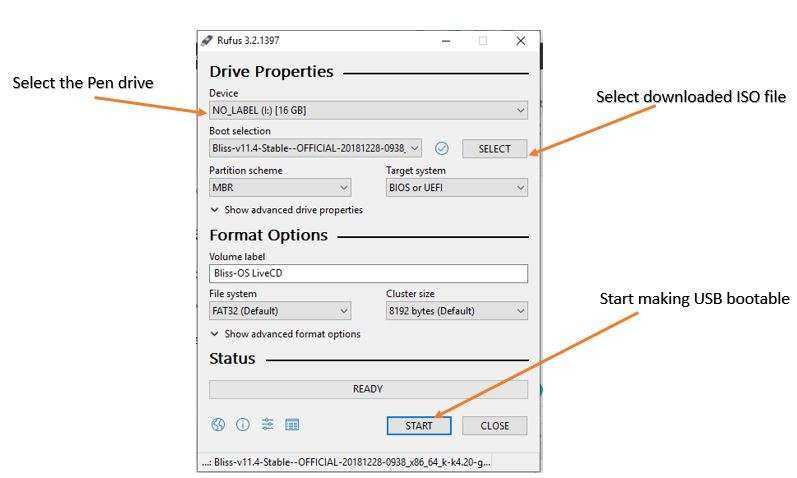
Next, download Rufus USB bootable software. Rufus doesn’t require any installation. Open the program, select Device, and choose your USB drive.
Click the “Format” button. Once the program has finished formatting the USB drive, it will prompt you to choose your boot key. Generally, it will be F10 or F12. Once this is done, click “Bliss OS” to install.
Installing ISO file
To install Bliss OS on your Windows PC, you can burn an ISO file to a blank DVD or USB drive. To do this, click on the Advanced tab, select “Auto installation,” and choose Yes when prompted to erase your computer’s hard drive. Press “Reboot” and your computer should reboot and display the Bliss logo. Click “Yes” to proceed.
Alternatively, you can use Rufus to install Bliss OS on your Windows PC. You can download Rufus from the official website, or use a portable version if you have one.
Rufus will automatically select the USB drive and erase all data. Once you’re finished, press the F10 or F12 function key to reboot and enjoy Bliss OS. Using the Rufus bootable software, you can install Bliss OS on your Windows PC for free.
Что такое эмуляторы? Особенности выбора.
Эмулятор — специальная программа, имитирующая программный функционал смартфона или планшета на мониторе обычного компьютера. В последнее время выходит все больше и больше оригинальных и интересных приложений. На сегодняшний день существуют десятки различных утилит для эмуляции операционной системы Android. Каждая из них имеет собственные преимущества и недостатки. К подбору эмулятора, который точно не разочарует пользователя, нужно подходить максимально ответственно. Ошибки при выборе могут привести к необходимости покупки и установке другого варианта
На что обратить внимание при выборе подходящей программы:
- цель дальнейшего использования;
- поддержка требуемых версий операционных систем смартфона и компьютера;
- удобство интерфейса;
- возможности производительности и быстродействия;
- практический функционал;
- языковая поддержка и доступность;
- минимальные системные требования.
Все доступные утилиты для эмуляции можно разделить по назначению:
- программы для обычных пользователей;
- эмуляторы для геймеров;
- софт для профессиональных разработчиков приложений для Android.
Программы для простых юзеров просты в управлении и предназначены только для быстрого и стабильного воспроизведения приложений Android. Эмуляторы для любителей мобильных игр отличаются качественной графикой и высокой производительностью. Кроме того для них характерна возможность использования дополнительных устройств — джойстиков, геймпадов и т. д. Средства для продвинутых пользователей и разработчиков подразумевают создание нескольких виртуальных устройств и имеют дополнительные опции для тестирования.
Перед установкой оболочки для эмуляции необходимо убедиться, что она поддерживает необходимы версии ОС компьютера. Часть программ не работает на устаревших версиях Windows, а некоторые — не имеют обновлений для работы с последними версиями прошивки Android.
Особое значение имеет удобство интерфейса эмулятора — в некоторых из них достаточно тяжело разобраться не только новичкам, но и опытным пользователям, а также производительность и быстрота загрузки приложений
Важно, чтобы игры и приложения не тормозили в процессе использования, а после их запуска не приходилось долго ждать их загрузки
Среди необходимого функционала программ для эмуляции ОС Android следует выделить:
- настройка параметров отображения;
- регулировка разрешения экрана, ориентации и т. д.;
- настройка управляющих клавиш и дополнительных устройств;
- встроенные интернет-браузер и менеджер файлов;
- наличие специальных средств для тестирования и разработки;
- возможность работы в полноэкранном режиме;
- запись звука и видео;
- возможность подмены GPS;
- установка приложений из магазина контента и путем загрузки apk-файлов.
Creating a bootable flash drive of the Bliss operating system, running in Live mode, installation
To create a bootable Bliss OS flash drive, you can use the following methods:
In all cases, you will need to disable Secure Boot to boot from the flash drive created later.
The next steps to execute in Live mode to familiarize yourself with the system without installing it on the computer would be the following:
- After booting from the Bliss OS drive, you will see a menu, the first item is to boot into Live CD mode.
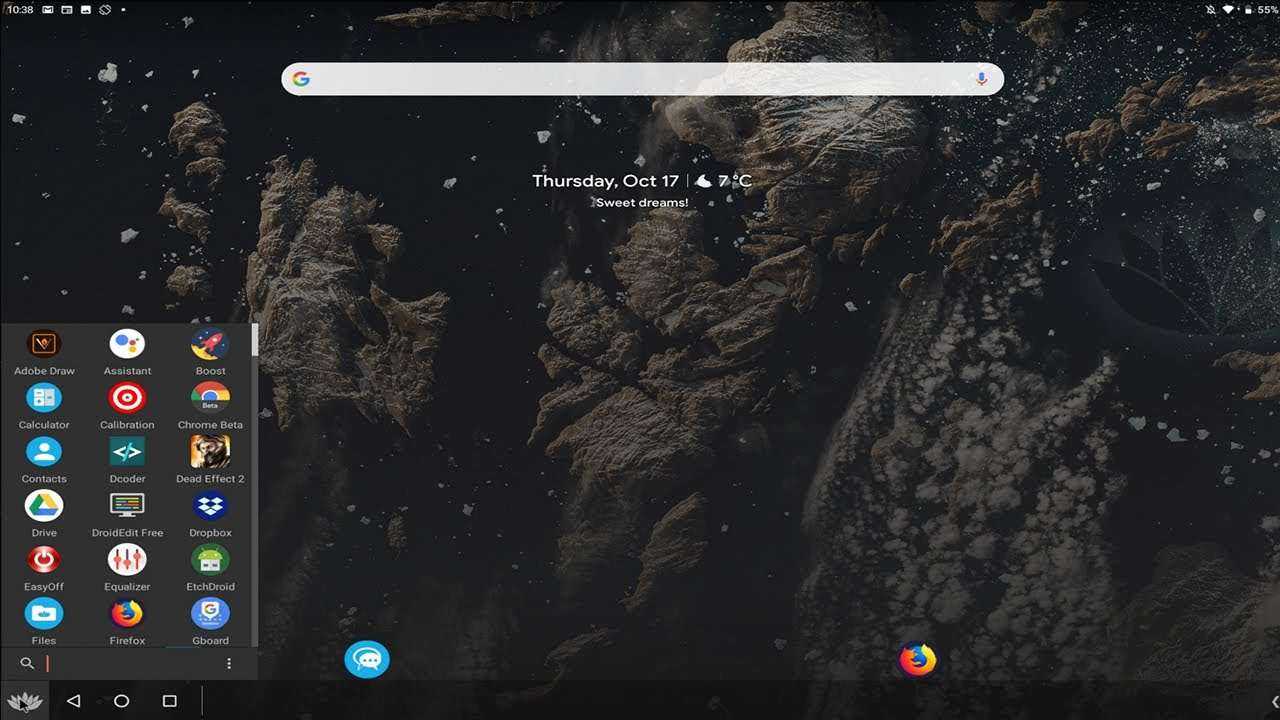
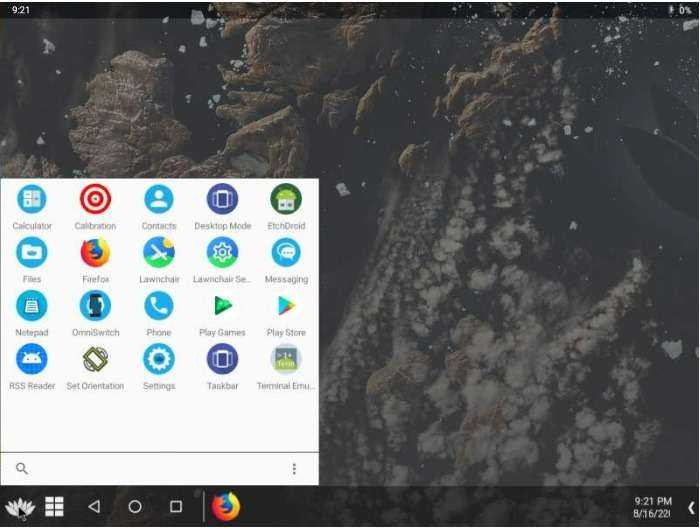
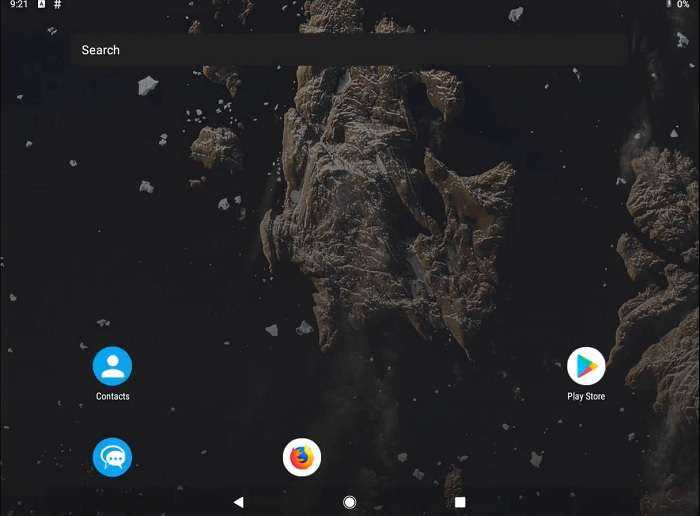
- Once Bliss OS starts, you will be asked to select the launcher, choose taskbar, an interface optimized for your computer. The desktop will open immediately.
- To set the Russian language of the interface, click the button analog “Start”, open Settings – System – Languages and input – Languages. Click on “Add a language”, select russian then, on the language preferences screen, move it to the first place (with the mouse over the bars on the right) to enable the Russian language of the interface.
- To add the Russian input option, in Settings – System – Language and input, click on “Physical keyboard”, and then – AI translated keyboard set 2 – Configure the keyboard layout, check US English. UU. And Russian. The additional input language will be changed with the Ctrl keys + Space.
In this point, you can begin to familiarize yourself with the system. In my test (tested on a Dell Vostro 5568 with i5-7200u) almost everything worked (wifi, touchpad and gestures, sound), but:
- Bluetooth didn’t work (I had to agonize over the touchpad since my mouse is specifically BT).
- The system does not see the internal drives (not only in Live mode, but also after installation, I have also checked) and behaves strangely with USB drives: shows them as it should, offers to format them, supposedly formats them, in reality – they are not formatted and are not yet visible in file managers. Decidedly, I did not perform the procedure with the same flash drive that Bliss OS was started with.
- A couple of times, Taskbar Launcher “it’s blocked” with a mistake, then it restarted and continued running.
Otherwise, everything is fine: the apk is installed (See How to download apk from Play Market and other sources), Internet works, the brakes are not noticeable.
Pre-installed applications include “Super user” for root access, a repository of free F-Droid apps, Firefox browser is pre-installed. And in the settings there is a separate item to change the Bliss OS behavior settings, but only in english.
In summary, It is not bad at all and I do not rule out that at launch it is a great Android option for relatively weak PCs. But for now I have a feeling for something “unfinished”: The Remix operating system, in my opinion, it seems much more complete and complete.
Installing the Bliss operating system
Note: installation is not described in detail, in theory, with Windows already installed there may be bootloader problems, take the time to install it if you understand what you are doing or if you are willing to fix the problems found.
If you decide to install Bliss OS on your computer or laptop, there are two alternatives to do it:
- Booting from a flash drive, select “Installation”, then set the installation location (separate from existing system), install the Grub bootloader and wait for the installation to complete.
- Use the installer found on the ISO with Bliss OS (Androidx86-Install). Only works with UEFI systems, you have to specify the ISO file with the image as source (Android Image), from what i could understand (searched in english forums). But in my test the installation by this method failed.
If you have previously installed similar systems or have experience installing Linux as a second system, I don’t think I have any problem.
Что вам потребуется
1. Отключите безопасную загрузку
Большинство поставщиков теперь поставляются с UEFI BIOS, поэтому в этом случае вам необходимо отключить безопасную загрузку перед ее установкой.
Чтобы отключить безопасную загрузку, просто перейдите в меню BIOS, используя (F2, F9 или любой другой ключ вашей системы, если вы не знаете точный ключ, просто введите его в Google, вы найдете), или вы можете отключить безопасную загрузку через Windows настройки.
- Перейдите в Настройки Windows 10 >> Обновление и безопасность >> Восстановление.
- В настройках восстановления нажмите на опцию перезапуска сейчас.
- Вы попадете в специальное меню загрузки, где вам нужно нажать на параметр «Устранение неполадок».
- Теперь нажмите Advanced Option и выберите Настройки прошивки UEFI.
- Отсюда вы можете легко отключить безопасную загрузку.
2. Создание раздела
- Щелкните правой кнопкой мыши значок « Этот компьютер» на рабочем столе и выберите « Управление».
- Затем перейдите к инструменту управления дисками из списка слева.
- Выберите раздел, на котором достаточно места (не менее 8 ГБ), а затем щелкните правой кнопкой мыши этот раздел >> Сжать том.
- Введите размер в мегабайтах, например, если вы хотите сделать раздел 7 ГБ, затем вставьте 7168 МБ, после выбора желаемого размера раздела нажмите кнопку « Сжать».
- Теперь ваш раздел успешно создан. Теперь запустите Rufus и выберите загруженный файл BlissOS.iso, а затем выберите USB-накопитель. (Держите USB-накопитель подключенным к ПК, не удаляйте его)
- Наконец, нажмите кнопку ОК.
3. Установка
- Теперь перезагрузите компьютер и нажмите клавишу меню загрузки, если у вас материнская плата Dell, затем нажмите клавишу F12 , у другого производителя другая клавиша меню загрузки (так что погуглите).
- Как только вы войдете в меню загрузки, выберите свое USB-устройство.
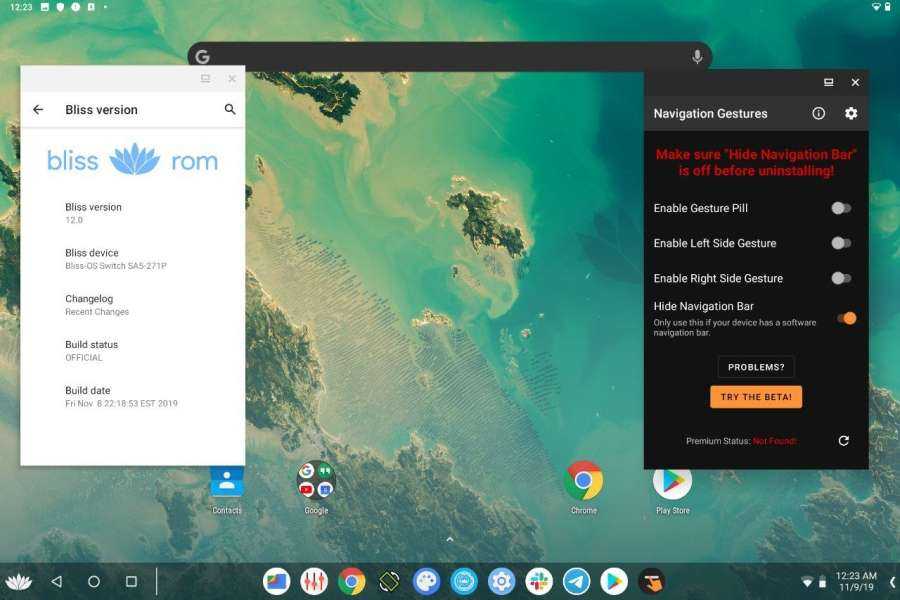
- Там вы увидите меню установки Bliss OS, и вам нужно будет выбрать 4-й вариант, который называется «Установка Bliss OS 12».
- Теперь вы получите окно схемы разделов и выберите раздел размером 7 ГБ, который мы создали ранее.
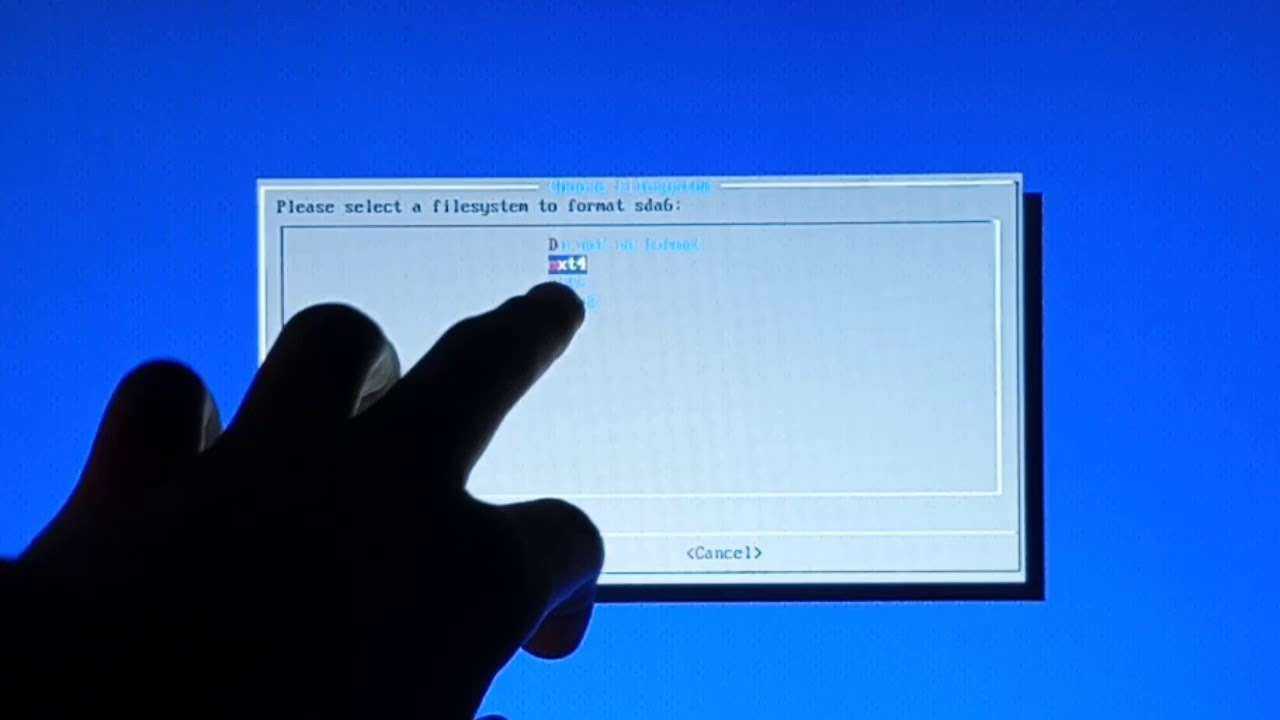
- Затем отформатируйте раздел в формате ext4.
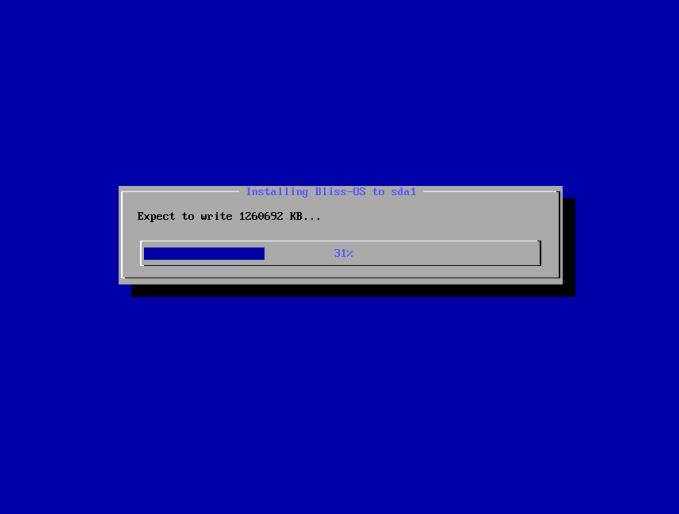
- После форматирования раздела должен начаться процесс установки.
- Когда установка завершится успешно, вам будет предложено создать образ диска, который требуется для внутренней памяти, как на смартфоне Android, поэтому просто выберите вариант Да.
- Теперь ваш Android 10 будет установлен на ваш компьютер.
- После завершения перезагрузите компьютер после отображения логотипа загрузки вы можете выбрать другую ОС BLiss Android 10 или Windows 10.
- Готово, теперь ваш компьютер работает под управлением Windows 10, 8.1, 7 и Android 10.
Это оно! теперь ваш компьютер работает под управлением Android вместе с Windows 10, вы можете выбрать, какую операционную систему вы хотите запустить, пока появится меню grub.
На сегодня все!
Этот пост тебе немного помогает? Если да, то поделитесь этим постом со своими коллегами и сообщите им, что они также могут запускать Android на своем ПК, Linux или Chromebook, если вам нужны более интересные и полезные руководства, подобные этому, тогда подпишитесь на этот блог, а пока оставайтесь настроен.
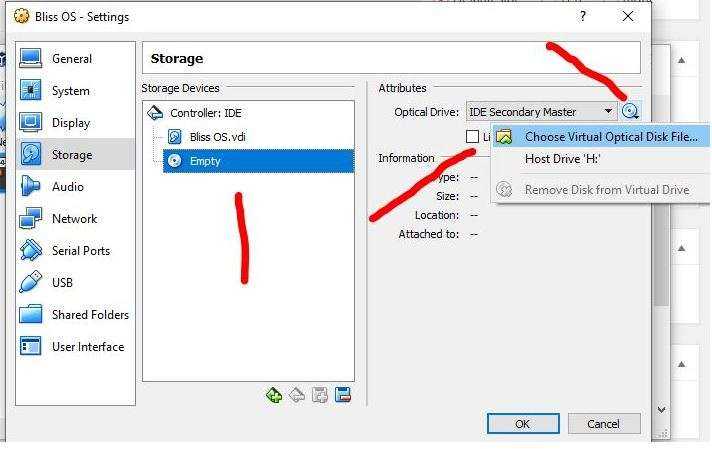
Install Bliss OS on PC and VirtualBox Virtual Machine
After creating the Bootable pen drive. Insert it into the PC system where you want to install the Bliss OS.
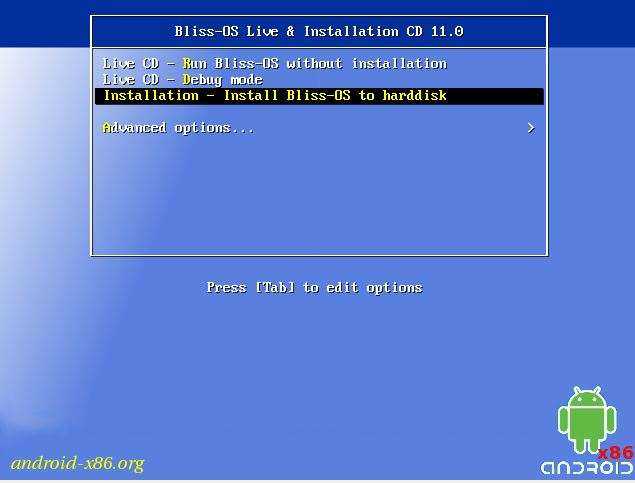
Step 1: Boot your system with Bliss OS USB drive
If your system’s first boot order is already set to Removable media then the OS will automatically boot. Otherwise first set the boot order. OR use any of this F2, F8, F12, or Esc according to your system BIOS to select the booting medium or device.
As the first screen of booting appears, select the Installation- Install Bliss-OS to hard disk option.
Use the Tab key and then arrow keys to select the Create/Modify partitions and click 0n the OK button.

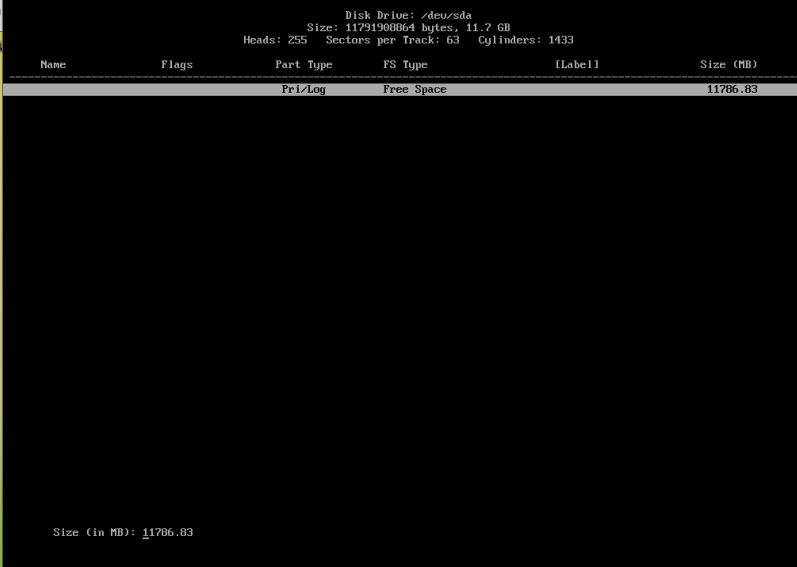
Step 5: Primary Partition
Here you will see the disk drive and its space in MB available in your same for both PC and Virtual machine. Select the Primary option and press the Enter button.

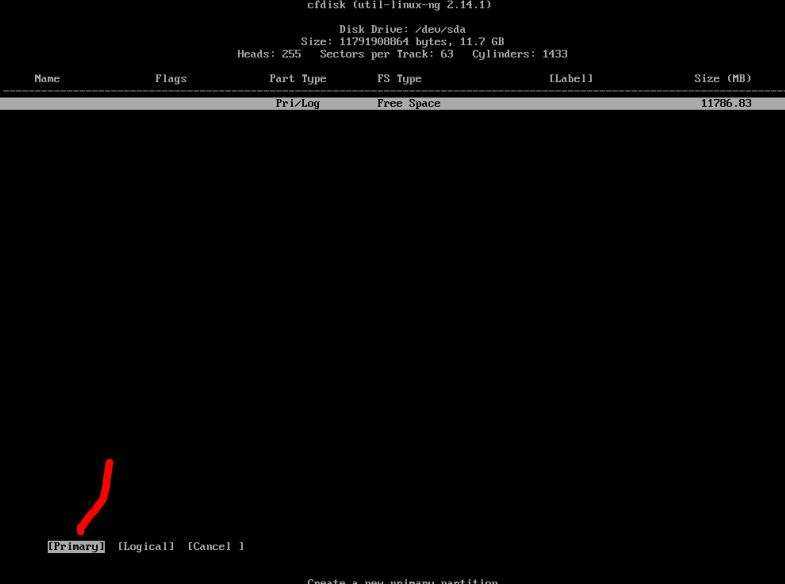
Enter the amount of space you want to allocate to the BlissOS and then press Enter.

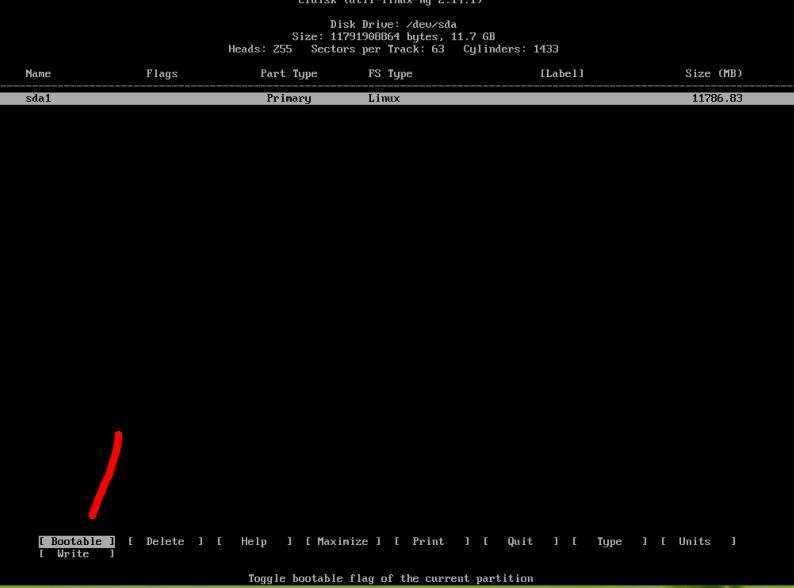
Now mark the created primary partition a bootable. For that just select the Bootable option and then the Enter button.
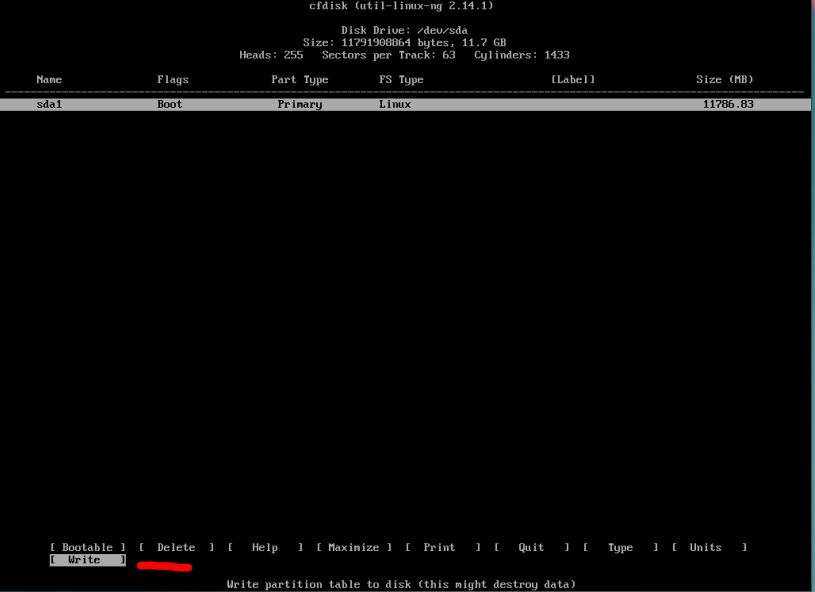
Step 7: Write the changes to prepare a disk for Bliss installation
After the above step, we need to write out alterations to the drive. Select the Write option for that and again press the Return/Enter key.
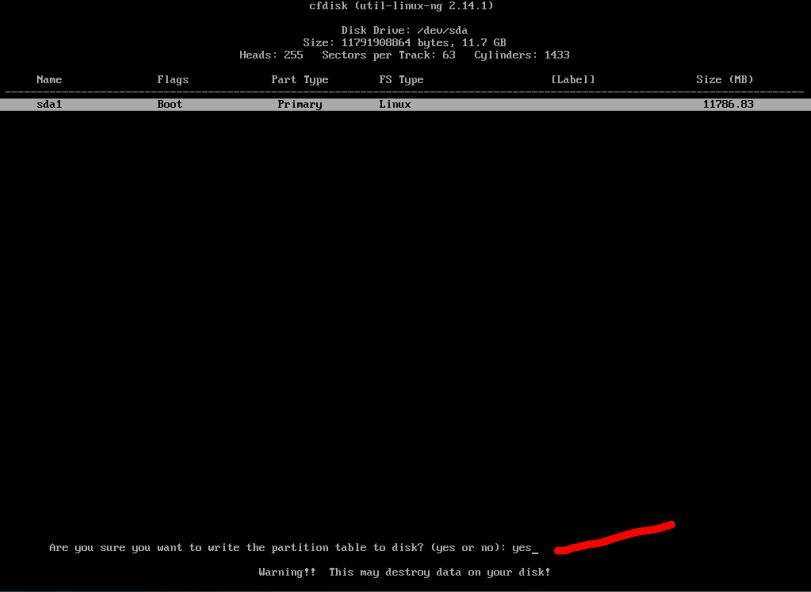
For implementing the changes, it will ask for your permission. Type yes
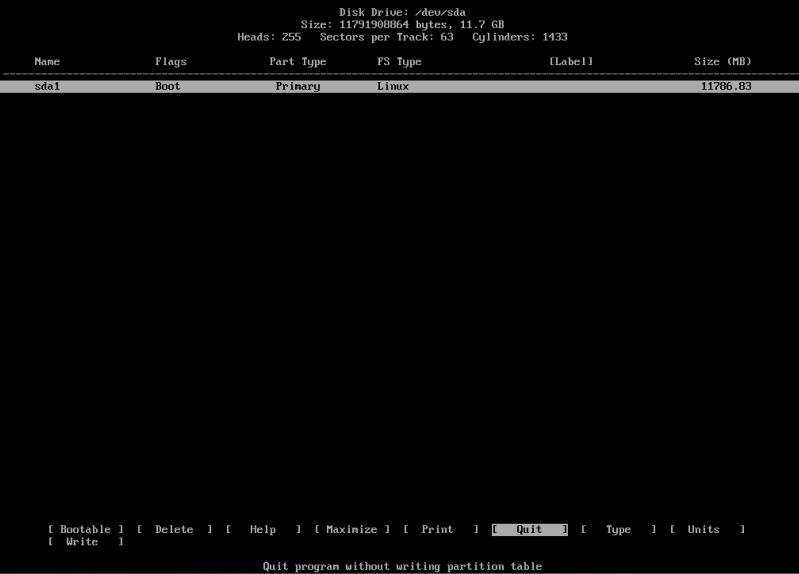
One the above step process is done, it’s time to quite the partition table creation tool. Use the Quit option.
Step 8: Install the Bliss OS
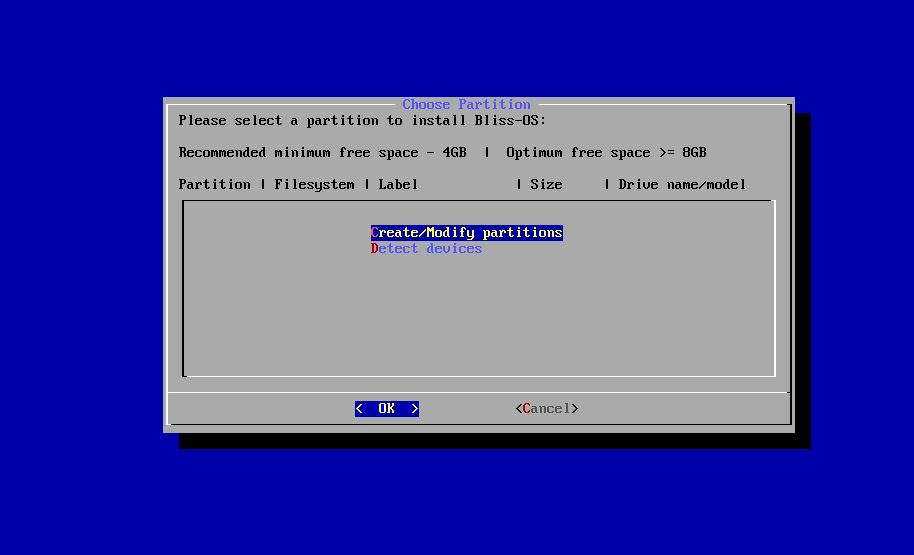
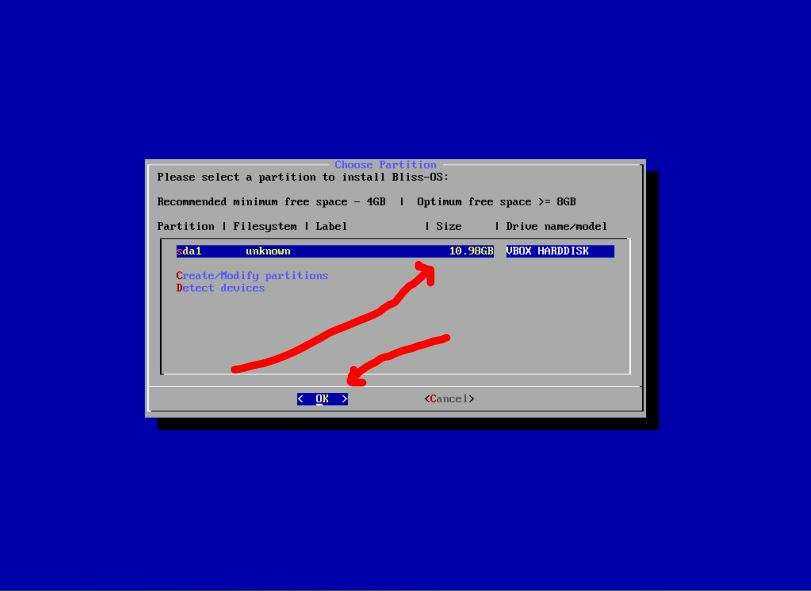
As soon as you quit you will again see the Choose Partition section, where this time you will find a partition to install the OS. Select that and press OK button.

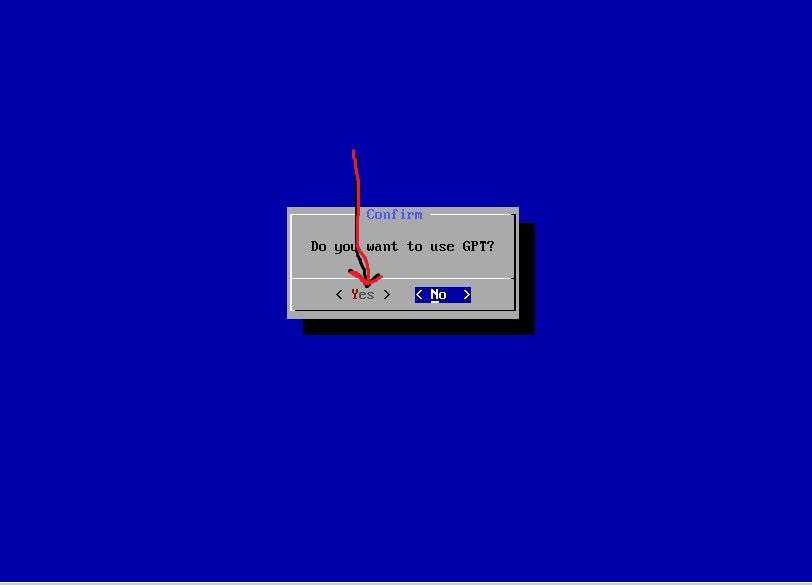
It will ask to create a GPT, just select YES.
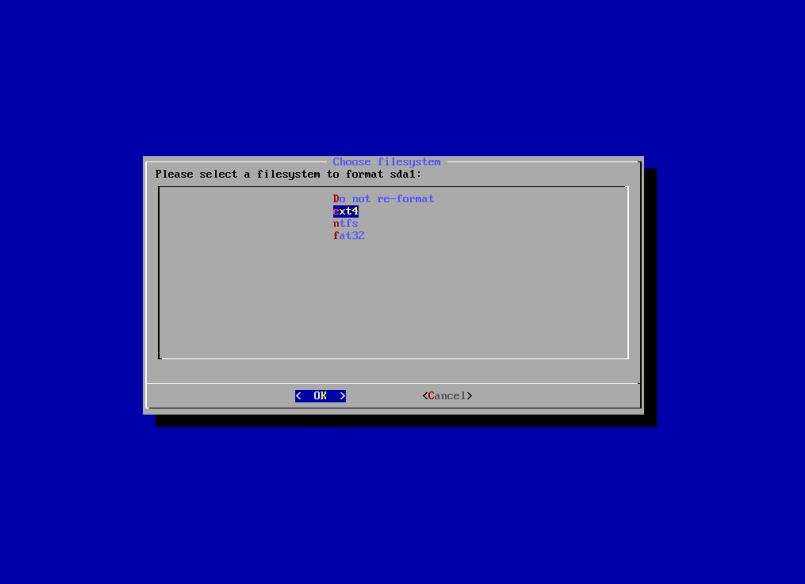
Format the drive using ext4 or any other filesystem format you want.
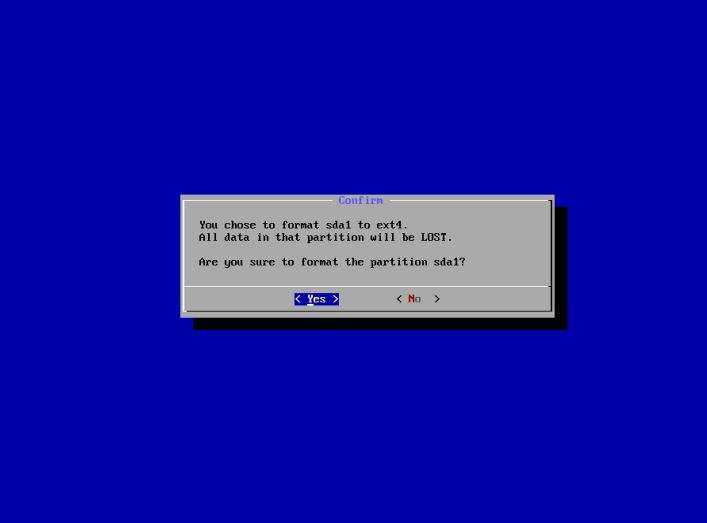
Select the Yes option.
Что такое эмулятор Андроид на ПК и для чего нужен?
Эмулятор Android — это специальная программа для PC (персонального компьютера), служащая для имитации работы операционной системы Android на других ОС, с частичной потерей или без потери функциональных возможностей при запуске приложений. Вы можете легко устанавливать и запускать игры и приложения Android на своем компьютере с его помощью.
Обычные пользователи используют эмуляторы в основном для игр, так как во многие мобильные игры намного удобнее играть на большом мониторе, чем за дисплеем смартфона. Так же нередко используются другие мобильные приложения, например онлайн-банкинг или мессенджеры. Если ваш гаджет не тянет новую игрушку или находиться в ремонте, то ее запуск на ПК или ноуте через эмулятор, легко решит проблему.
Большинство видео-обзоров на Ютуб мобильных игр и приложений, так же монтируется через эмуляторы.
Так что вещь полезная и во многих случаях эффективная.
Существует множество версий OS Android. При выборе того или иного эмулятора убедитесь, что он сможет запустить вашу игру или приложение.
Для установки и запуска многих эмуляторов Android требуется, чтобы на ПК или ноутбуке были включены технологии виртуализация Intel VT-x или AMD-v. По умолчанию они всегда включены, но если при установке возникают проблемы, то зайдите в BIOS (UEFI) и проверьте настройки.
Ниже я привел список всех наиболее используемых эмуляторов Android для Виндовс, Мак и Линукс, включая портативные (без установки), такие как Bliss OS, средства для разработчиков и др. Я постарался их разместить в порядке популярности использования.
Так же я хотел, чтобы вы проголосовали за тот или иной эмулятор. Благодаря этому у каждого появиться рейтинг, что поможет выбрать еще неопределившимся пользователям тот или иной продукт, который соответствует его потребностям.
Method 1: Install Android(Bliss OS) on UEFI PC
You can also watch complete video tutorial below.
Dual-boot installation for UEFI system
This is the easiest way to install Bliss OS but this method will only work on UEFI systems. You will be able to easily dual boot your Android OS with Windows. And it is also safe as none of your partitions are changed and no need to format any partitions.
But To install Bliss OS you need to disable secure boot first. To disable secure boot, at computer startup press F1 or F2 or ESC (Keys vary from manufacturer to manufacturer) to get into the BIOS menu. In the BIOS menu navigate to Boot tab in the Boot tab, disable secure boot. This process might be different for your PC so you can google search how to disable secure boot with your PC make.
- Go to the folder where your Bliss-OS iso file is saved.
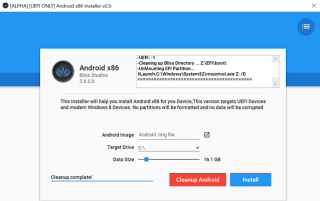
- Double click on Bliss-OS iso file and run Androidx86-Install file. If you are unable to open it directly then you can use Winrar to extract it the ISO file and then run Androidx86-Install.
- In the Android image section, click on it and browse to the downloaded Bliss-OS iso file and select it.
- While C:\ is the default installation dive you can change it to any drive you like.
- Select installation size 16Gb or higher according to your needs. The more games and apps you want to install the more space you should allot.
- Click Install and wait, after some time installation will get completed then you can reboot and select Android X86 in the boot menu and then enjoy using Android on your PC.
Эмулятор Android
Установка Android-эмуляторов в этой статье подробно рассмотрена не будет. Во-первых, по причине некоторой неполноценности каждого из них (где-то могут быть проблемы в настройке манипуляторов, в других – «косяки» в работе графики в приложениях). Во-вторых, если вы действительно хотите опробовать этот вариант, с установкой эмулятора не должно возникнуть никаких сложностей – это не тяжелее, чем установить любое другое приложение под Windows.
Я могу лишь перечислить некоторые эмуляторы, на которые можете обратить внимание по причине достаточно простой установки и относительно сносной работы: Droid4x, Bluestacks и Genymotion. По собственному опыту могу также сказать, что для моих целей подошел первый, но оговорюсь, что цели у меня были специфичные
Чтобы немного помочь пользователем, которые решили использовать эмуляторы я решил добавить видео, которое позволит понять принципы установки:
Bliss OS
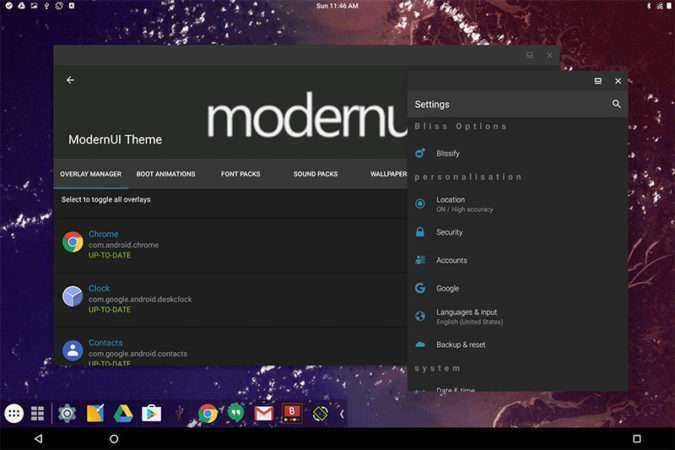
The Bliss team has been at the forefront of Android desktop development for a number of years. Run by a team of volunteers, they have a vision of a synchronized OS spread across multiple devices and form factors. If you want to know which features will be in other Android distros in coming years, you can give Bliss a try.
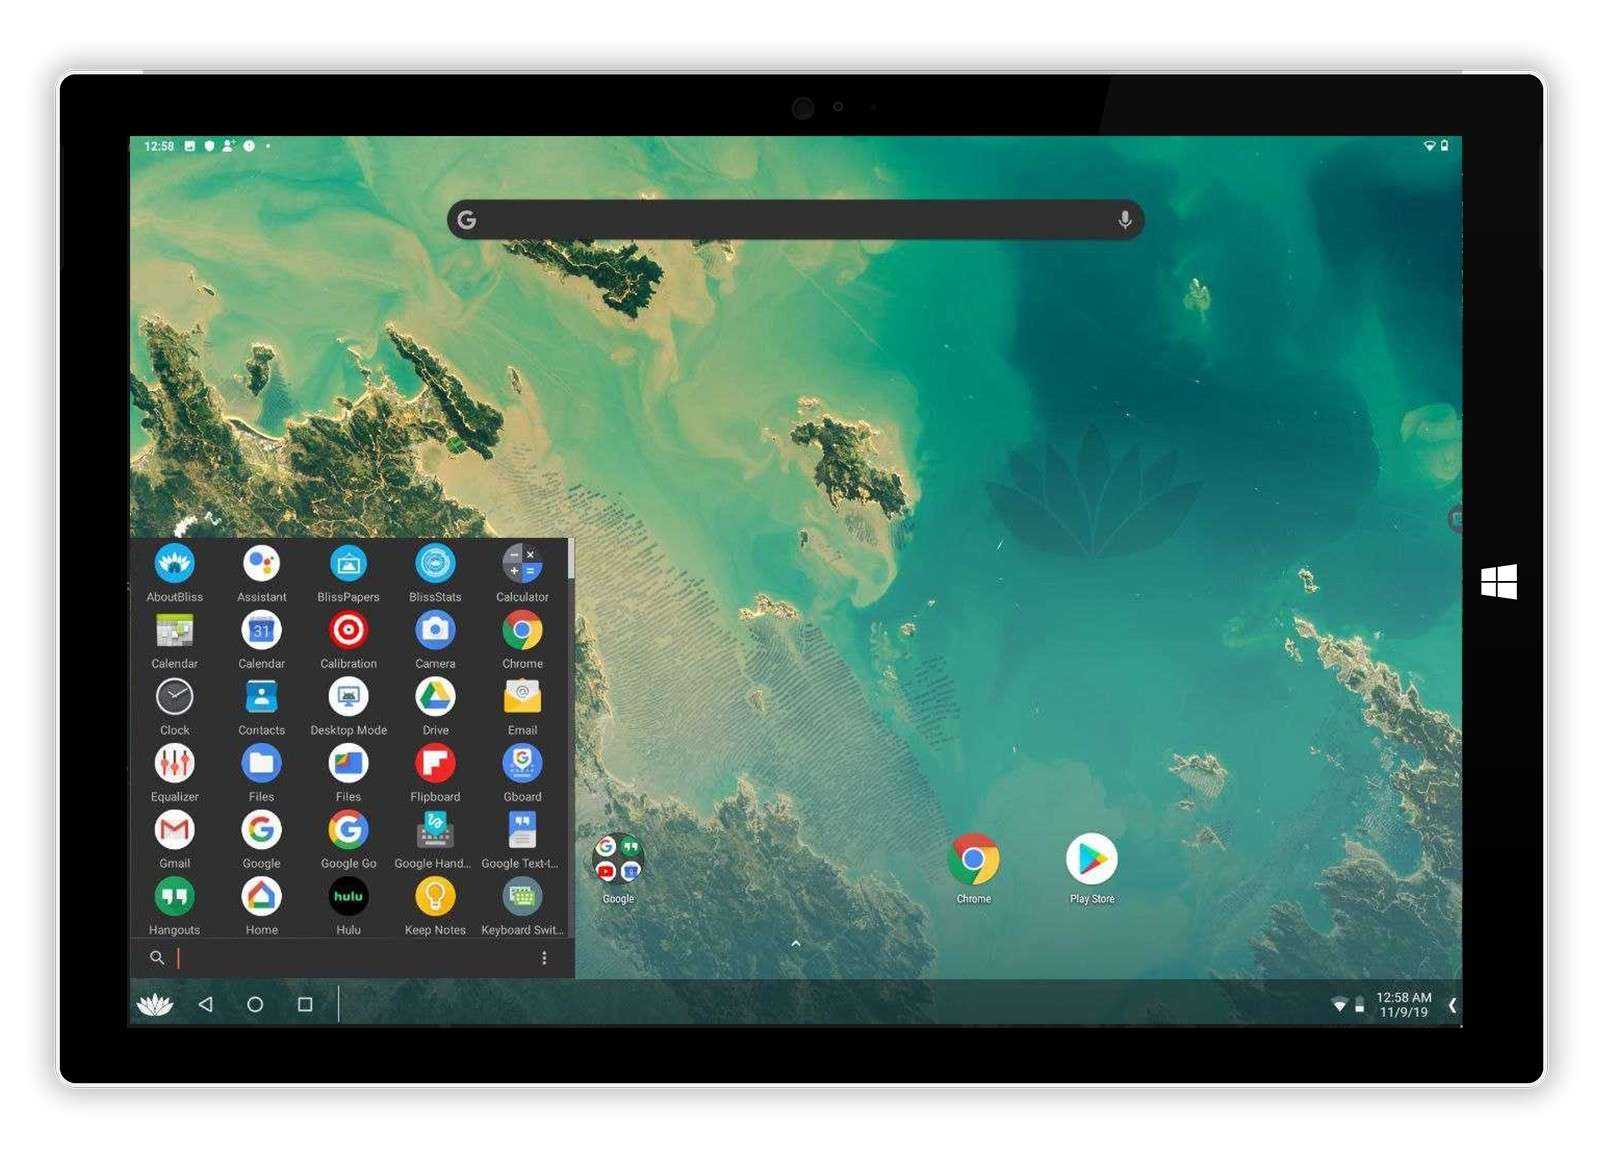
Its interface is innovative and extremely engaging, letting you switch at will between a desktop system and a touch-style interface. Experimental Vulkan support is also available, along with a “Blissify” option that lets you fine-tune your GUI in minute detail. Firefox is also preinstalled, and the good news is that it suspends properly.
Some older releases were notoriously unstable – even the menu itself wouldn’t always load properly. The current release appears to be more stable than previous versions, so the Bliss team may be reigning back the innovation a little in favor of tightening up the code.
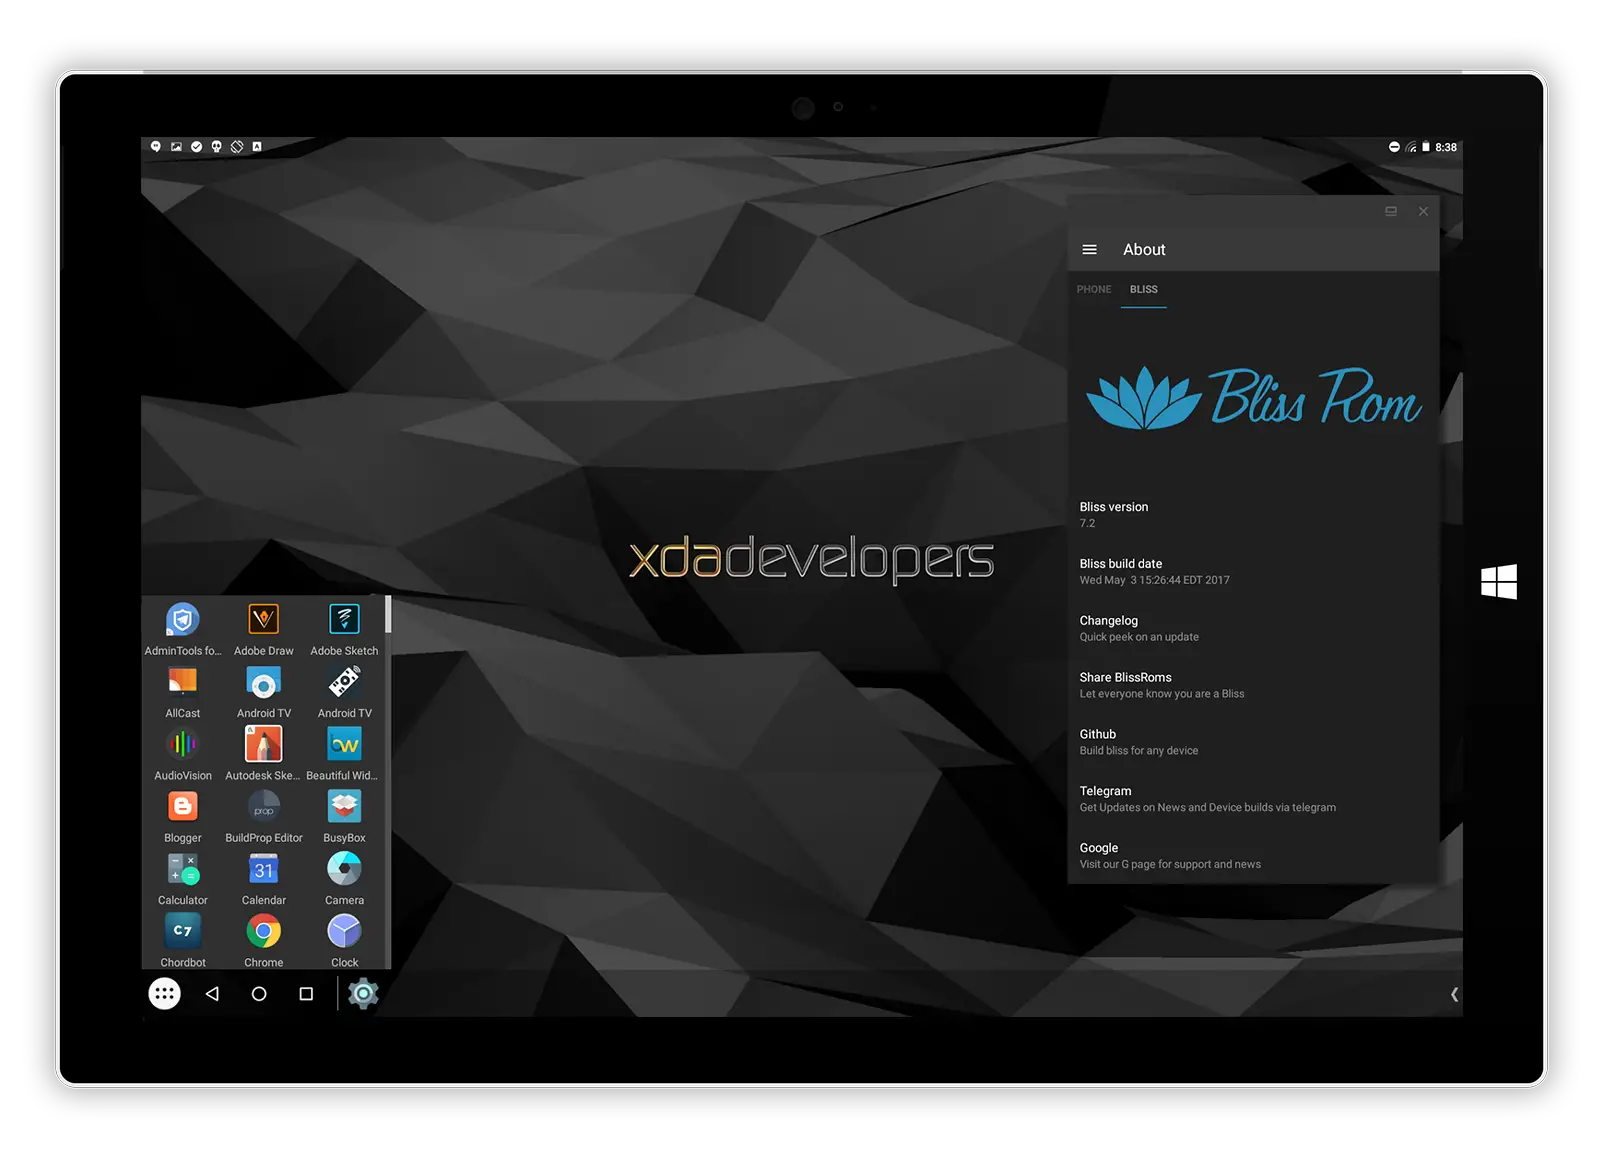


Bliss certainly has its fans, and some hardware seems to work well – especially touch devices like the Surface Pro. Older versions didn’t function as well with a keyboard and mouse, but newer versions seem to work better. If you’re interested in Bliss, now is a good time to check it out – just be prepared for some possible glitches.
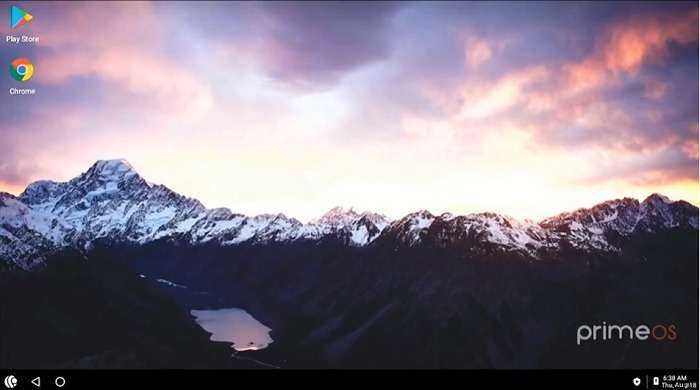
Где скачать PrimeOS
Адаптация Android для компьютеров свободно распространяется и доступна для скачивания в нескольких вариантах на официальном сайте проекта, а также на других ресурсах интернета. Система не требовательна к девайсам, но если вы решили портировать Android на компьютерное устройство путём установки Prime OS, при выборе версии следует учитывать характеристики оборудования, например, для х64 потребуется минимум 2 ГБ оперативной памяти и поддерживаемые процессором инструкции SSE 4.2. Для старых моделей ноутбуков или ПК предусмотрен дистрибутив PrimeOS Classic 32 bit.
Так, на официальном сайте вы найдёте три версии ОС:
- PrimeOS Mainline 64 bit (для сравнительно новых систем). Этот вариант подойдёт только для устройств, выпущенных в 2014 году и позднее, например, процессоры 5th Generation Intel Core i series и выше, Intel Celeron N4000, AMD A8 7410 и пр., с поддержкой инструкций SSE2. Что касается графики, то данная версия ОС совместима с Intel и AMD GPU, тогда как Nvidia не подходит, что может вызвать лаги и зависания.
- PrimeOS Standart 64 bit (для систем 2011 года выпуска и позднее). Запросы этой версии более скромные, она будет работать на девайсах с процессорами, выпущенными с 2011 года, например 2nd Generation Intel Core i series или выше, Intel Celeron N3350, AMD A8 5550M и др., от процессора также требуется поддержка набора команд SSE2. Версия совместима с графическими процессорами Intel, AMD, Nvidia.
- PrimeOS Classic 32 bit (для старых систем). Версия будет работать с процессорами, изготовленными до 2011 года, такими как 1st Generation Intel Core i series, Intel Pentium dual core, AMD Phenom II X6 1100T и прочими, а также старыми графическими процессорами Intel, AMD, Nvidia.
Кроме того, для каждой из версий предусмотрены и варианты загрузки дистрибутива:
PrimeOS
The Prime team have put an emphasis on gaming with their “DecaPro Gaming Center.” This has specific game optimizations to map touch-screen controls to the mouse and keyboard, which will be especially popular with those who like PUBG Mobile.
However, it’s also a massive letdown due to its broken “Sleep” function. When we tried to suspend the machine, the screen simply went black while the backlight stayed on, and machines with mechanical hard disks emitted an awful noise that had us reaching for the power button. Furthermore, PrimeOS isn’t open source, and documentation is severely lacking.
On the off chance you don’t need a “Sleep” function, PrimeOS would make the nicest package. However, this is unlikely among Android users who will probably be using some kind of portable device that needs to be quickly switched off.
Dual Boot Windows 10 and Bliss OS on Single Hard Drive
Dual boot is a long shot, it means it takes time compare to the installation you just performed.
Open Disk Management on Windows and expand at least 30 GB amount of storage for Bliss OS. Don’t create it a drive or while installing you will wipe out the Hard Disk.
Next Create a Bootable USB of the Bliss OS and boot it by pressing the boot key. On the Installer Window choose Install Bliss OS to Hard Disk.
In the partition Window Choose Create / Modify Partitions.
In the next window, it will ask from you, do you want to use the MBR or GPT Partition, choose MBR by selecting No.
In the partition window, you will see all the hard disk, and also you will see the free space you just expanded before. choose the free storage and then choose new with the Arrow keys. Then Hit enter on the keyboard to confirm it. Then Choose Primary, again hit enter with the amount of storage, click enter on the bootable to make it boot next time.
Use the arrow keys and this time choose write to format the disk. in the next step type yes, to format it. Once it is formatted choose quit and you will be on the window, where it says choose the drive to install Bliss OS. Choose the drive and then choose ext4 for the file format. Again the Bliss OS will ask are you sure to format this partition, choose yes and wait until it is done.
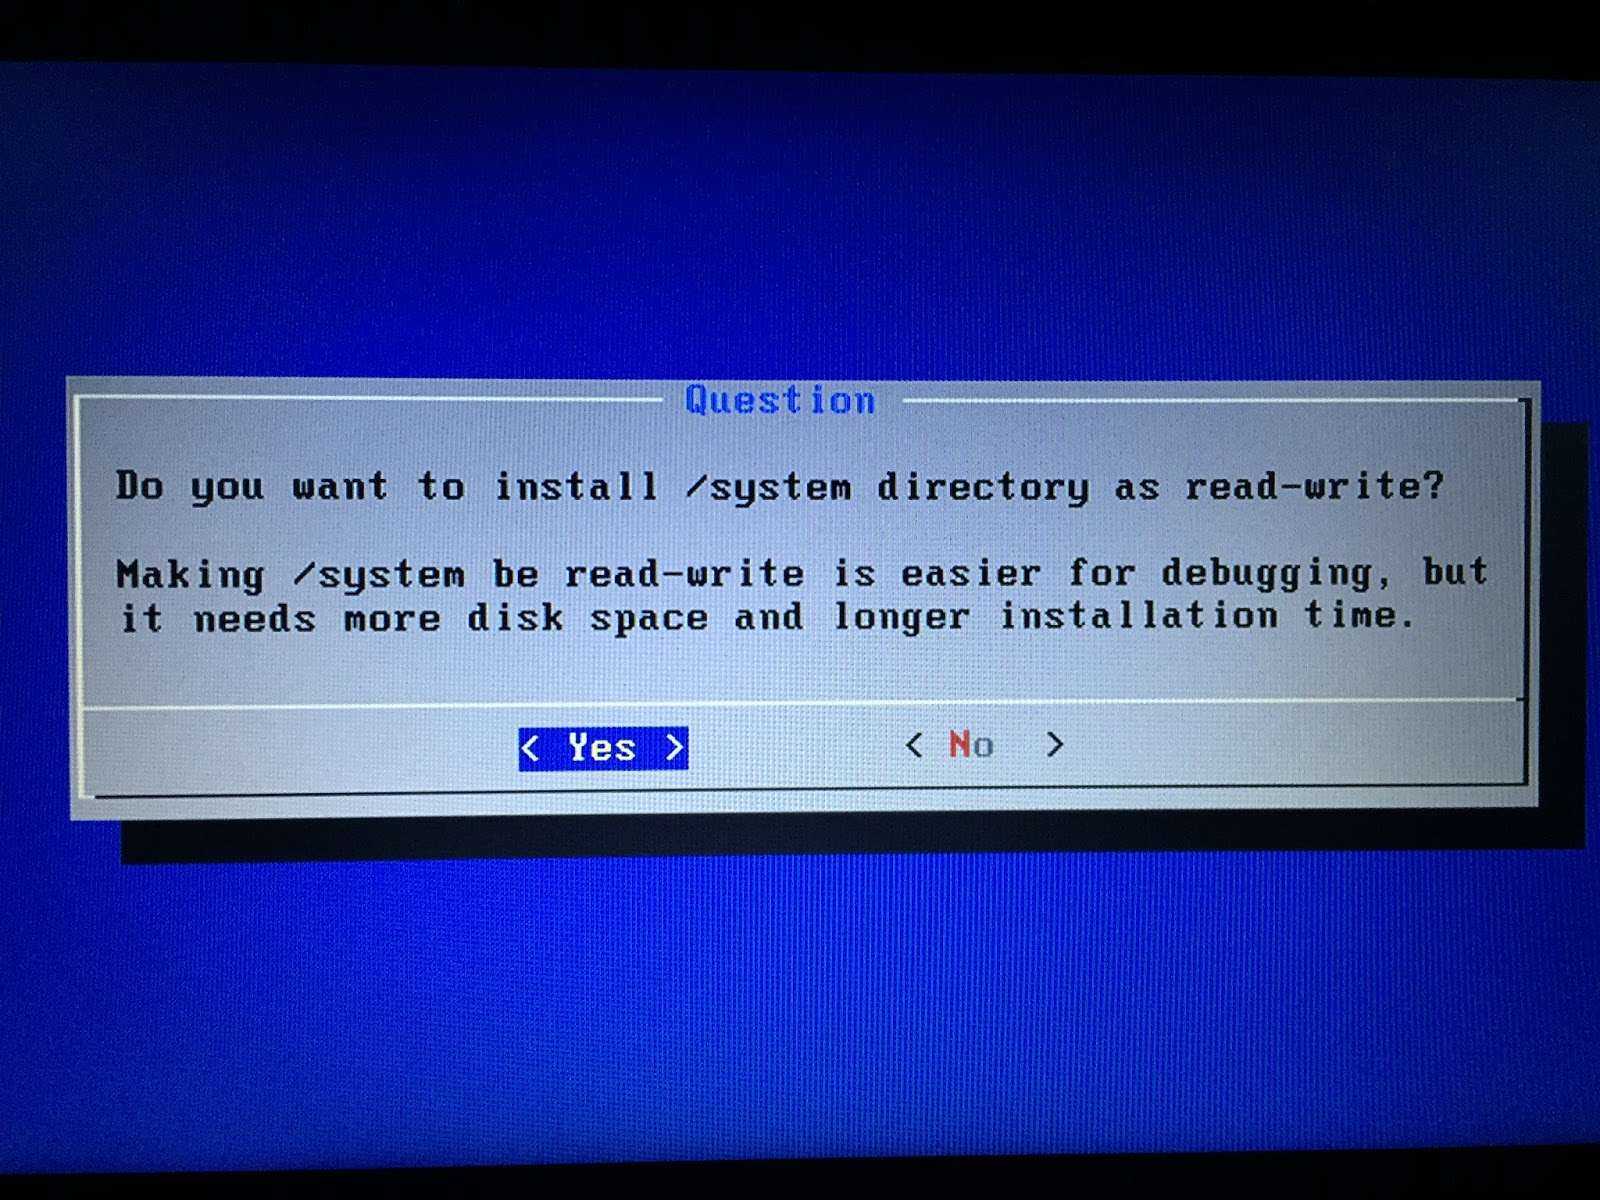
Choose Yes for GRUB Bootloader, also choose yes for system directory to be read and write.
Once the installation is done, it will ask you to reboot run the Bliss OS. Choose reboot and unplug the USB.
 Bliss OS Version 11 (Android Pie)
Related Searches:
- how to install bliss os on pc dual boot
- bliss os for pc download
- how to install bliss os on virtualbox
- bliss os not booting
- how to install bliss os on usb
- bliss os iso
- bliss os xda
- bliss os download for pc 64 bit
- bliss os 12
- how to install bliss os on pc
- bliss os iso download
- bliss os xda
- bliss os 12 download
- bliss os virtualbox
- bliss os 12 secret code
- bliss os download for pc 64 bit
Вместо итога
Попробовав PrimeOS, вы, скорее всего, будете разочарованы, если только до этого не имели дело с портированными на ПК версиями Андроид.
За исключением косметических изменений, индийские разработчики не привнесли в Android-x86 ничего принципиально нового, то же самое касается Phoenix OS и других модификаций мобильной системы.
Такое ощущение, что создатели сборки отремонтировали лишь фасад, оставив всё внутри без изменений, не говоря уже о крайне неудобном мастере установки, остающимся неизменным уже много лет.
-
Как создать птичку twitter в coreldraw
-
Как рисовать дерево на планшете
-
Какой сокет у ryzen 5 3600x
-
Daz3d как изменить соотношение сторон
- Как сделать тень текста в coreldraw